|
|
Post by BERNARD "HOT ROD" KRON on Sept 27, 2012 0:16:06 GMT -4
Starting another project, another racer, and another spare parts special. This time it’s a Revell 5-window Deuce done as a full-on Bonneville racer, a highboy with a radical 6 ½ inch chop and full bellypan. Motivation will be from a Revell Parts Pack blown Ford 427. So far I have the top cut and the edges and rolled pan for the belly pan installed. I also smoothed the stock hood to get rid of the center hinge. I think the hood will stay smooth since the highboy configuration is probably tall enough to contain the top mounted blower and injectors. With the mail slot windows and the belly pan hiding most of the chassis I’m tempted to forego the interior and most of the chassis and suspension. We’ll see as the build progresses. I’m planning on Krylon Mango (a bright yellow-orange solid) for the main color with red home-made team decals. I may also make provision to display the car as a part-time drag racer with switchable tires and wheels. Again, we’ll see how elaborate I want to make this one… Thanx for lookin’, B. 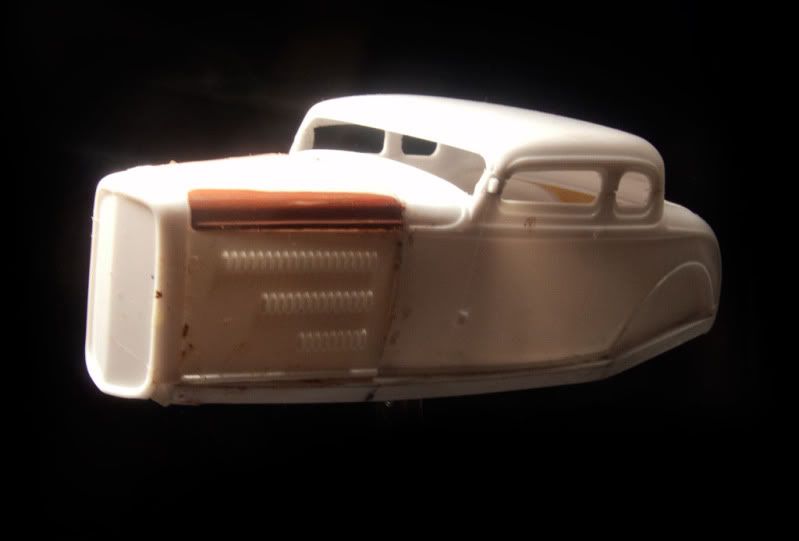 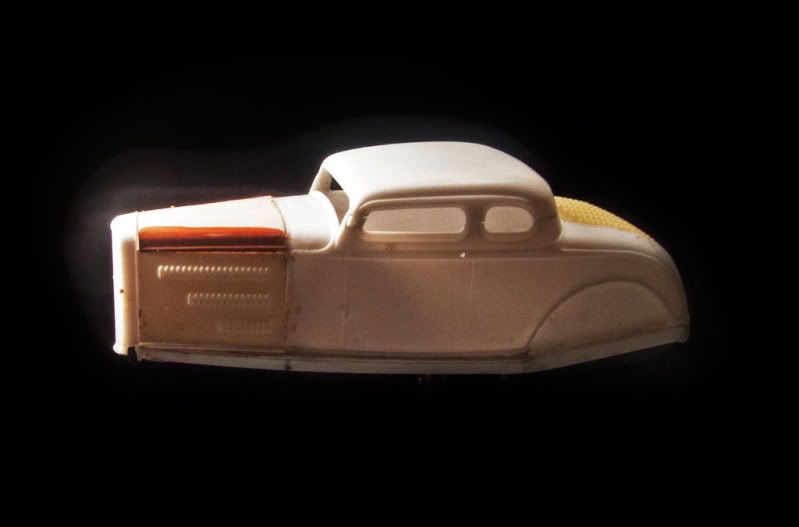 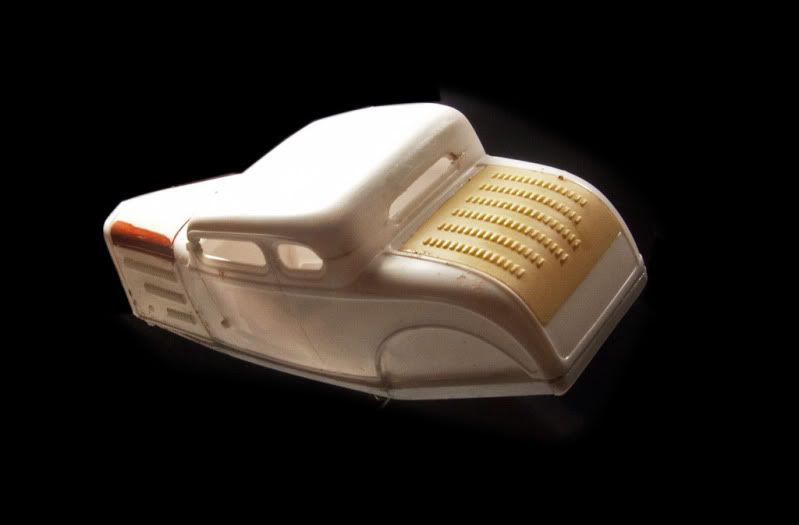 |
|
Deleted
Deleted Member
Posts: 0
|
Post by Deleted on Sept 27, 2012 4:54:04 GMT -4
as usual Bernard great start
and l am sure this will a killer build
|
|
|
|
Post by DAVE WOOD "Nitroholic" on Sept 27, 2012 9:24:36 GMT -4
Already Looking Mean, I'll be watching this one  |
|
|
|
Post by KRAZY RICK on Sept 27, 2012 10:36:16 GMT -4
Looking Good Bernard !!!
|
|
|
|
Post by BERNARD "HOT ROD" KRON on Sept 28, 2012 21:14:47 GMT -4
Thanx everyone! I’ve gotten it up on its wheels. No rear suspension since it will be hidden under the bellypan, just a simple tubular rod connecting the rear wheels. The front suspension is the Revell Deuce kit piece with a few leaves removed. Wheels are the LSR Moon disc set from Early Years Resin. The front tires are Revell ’37 Ford Delivery Van pieces and the rear are truck tires courtesy of Herb Deeks. The level stance, typical of lakes cars, takes some getting used to, I’m so accustomed to the extreme rubber rake of street rods and drag strip racers. It makes me think some more about making up a set of drag strip tires and wheels as an alternative setup. Here are some pics (sorry about the blurry side view…). Thanx for lookin’, B. 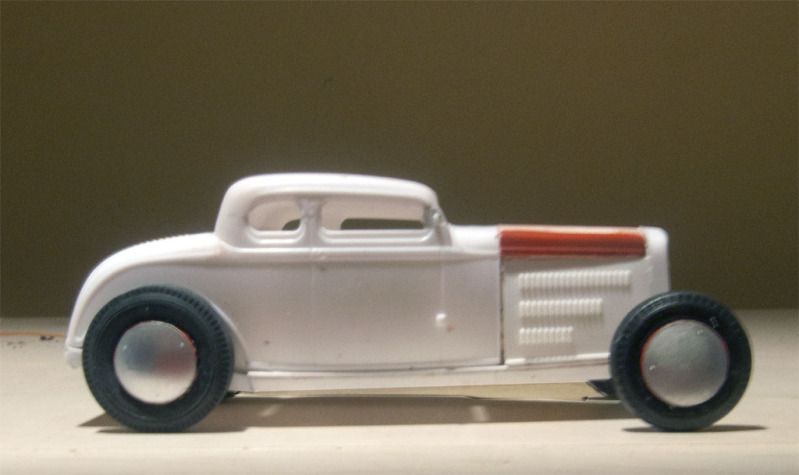 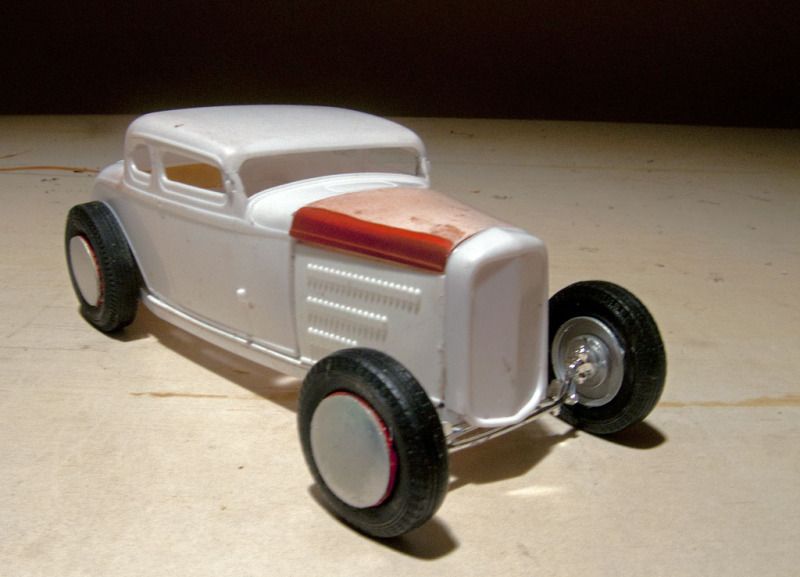 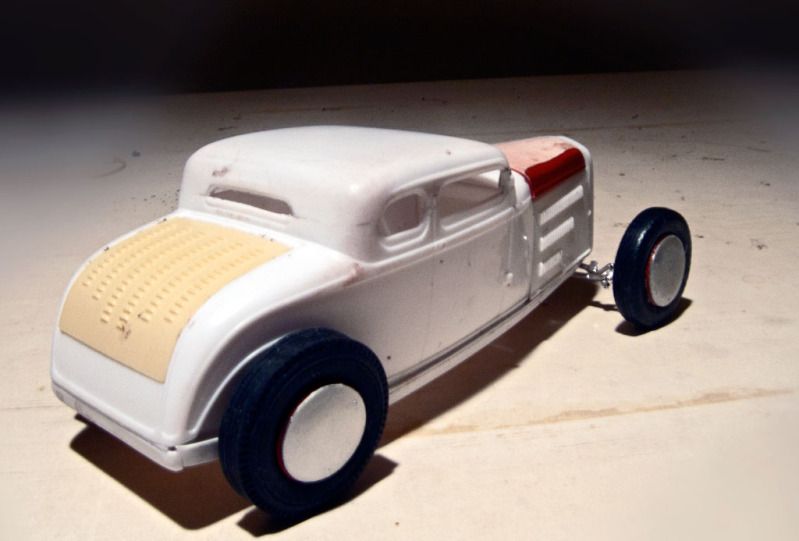 |
|
|
|
Post by BERNARD "HOT ROD" KRON on Sept 29, 2012 13:47:39 GMT -4
I’ve always believed that dialing in the proper stance on a car is largely a matter of instinct and is difficult to reduce to a set of rules. The stance on this car bugged me, and as much as I knew that a flat stance was historically “correct” it didn’t look right on this particular car. It needed the nose to come down, primarily because of the curvature of the bellypan and the severe chop. The front end needed to “settle in” to the front wheels more. So this morning I took .06” (1.5 scale inches) out of the front height by de-arching the front spring and shaving the front spring mount. Below are a couple of pictures. The top one is a “before and after” with “before” on the left. The second one is a front ¾ view. As you can see the car now has a very slight rake but the shadow line below the bottom edge of the body is largely parallel to the ground line forward to the firewall and then moves only slightly upward to the grill shell. Also, the arch of the front tire now complements the ends of the louver rows. Most importantly, the little man inside my head is says “much better” and will now leave me alone to move forward on this build! Thanx for lookin,’ B. 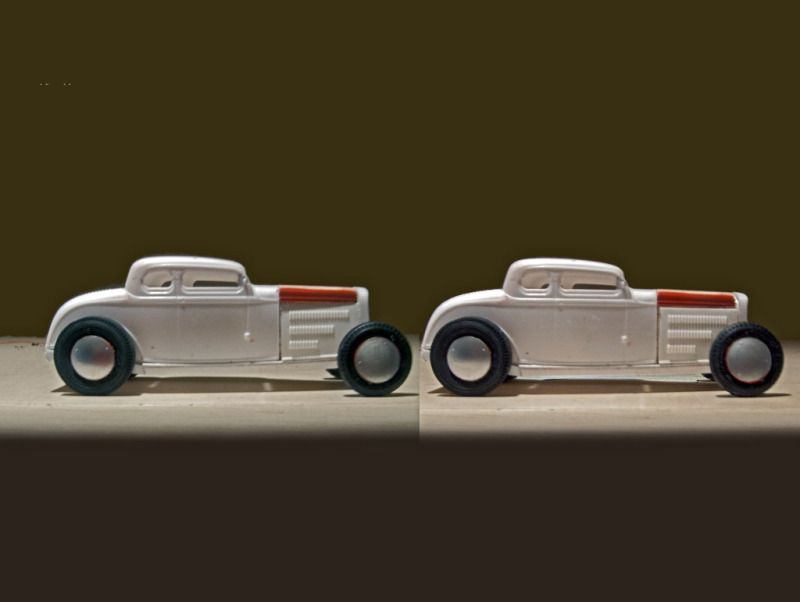 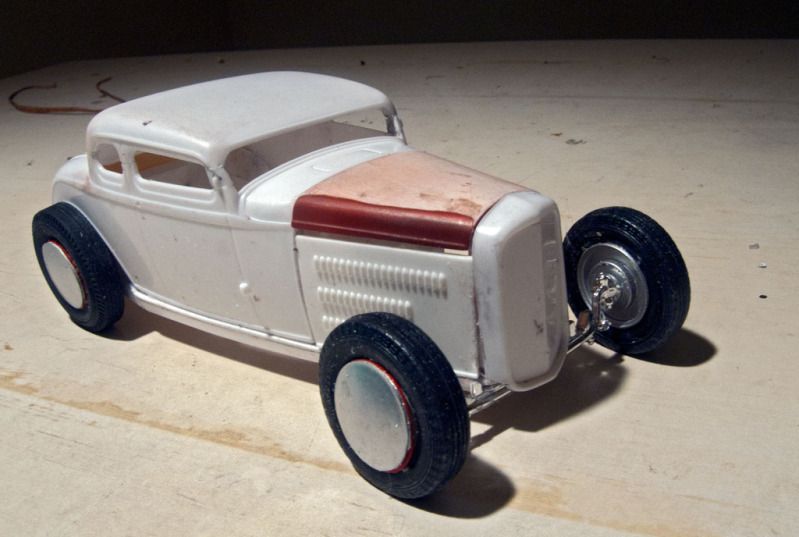 |
|
|
|
Post by BERNARD "HOT ROD" KRON on Oct 14, 2012 1:19:05 GMT -4
This build is definitely going non-linear on me which is why I haven’t posted in a while. The issue is the bellypan. The interior will have to be built, painted and glued in place before the bellypan is installed. In order for things to be relatively well finished this implies that all the sub-assemblies for the build will have to be fabricated, painted and built up before assembly. Now I know that that’s the theoretical best practice for any modeling project, but personally I’m a pretty improvisational builder and planning that far ahead isn’t necessarily something I always do. So I’ve spent the last couple of weeks thrashing around determining what the sub-assemblies actually are, the sequence of assembly, and what will need to be touched up or repainted after final assembly (notably the bellypan). I have gotten several things done, however. First off, after looking at the car some more I realized that the Ford 427 V-8, which dates from 1964, and was expensive and rare at that point, just didn’t make sense for the type of car this was turning out to be. The general vibe is more 1962 and relatively modestly budgeted, rather than mid to late 60’s. So I decided to change motors. I settled on the blown Nailhead from the Revell Tony Nancy Double Dragster kit because I could be sure the motor would be narrow enough to fit within the bodywork. That, and it was period appropriate. I built it up with some minor changes to make it look more utilitarian. All the chrome parts were stripped, the stock valve covers were painted gold and the block red with Tony Nancy style red trim on the blower. I’ll be using the block hugger headers from the AMT ’40 Ford Sedan Delivery kit, again stripped of their chrome and finished in stainless steel metalizer. Despite the fact that I’m using Hilborn 4-port injectors rather than the taller Enderles from the Nancy kit, it appears highly likely I’ll have to cut a relief hole in the hood and install a low scoop over it. With the motor largely built it was time to cut and install the bellypan to test for fit and clearances. The basic bellypan was made from .020” styrene stock and glued in position. The motor was then mocked up into place. It was immediately obvious that a relief panel would be needed to clear the oil pan. This was fabricated from various shapes of styrene and molded into the bellypan itself. I then filed the edges to shape and broke the bellypan out from the bottom in order to allow access to the interior. The pan will be re-glued into place during final assembly, any gaps filled and smoothed, and, with the entire rest of the car masked, painted to match the bodywork. The interior will be based on the stock Revell 5-window parts. However, I’ve decided to make new parts rather than using the kit ones so that I still have a relatively complete 5-window kit for future use (the body for this project was a spare). I’ll be cutting and fitting the panels in the next few days. The interior will be bare bones sheet metal with a single aircraft style bucket seat. Below are a couple of pictures showing the bellypan and the motor. Thanx for lookin’, B. 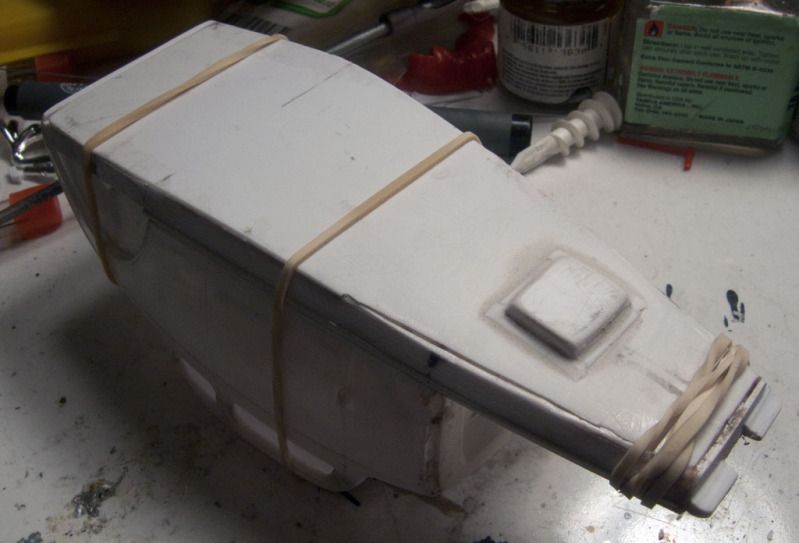 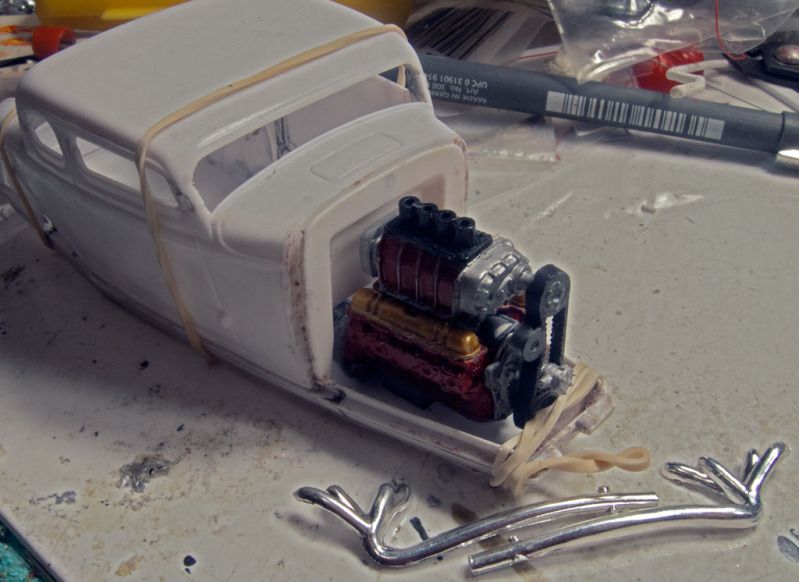 |
|
|
|
Post by KRAZY RICK on Oct 14, 2012 5:53:06 GMT -4
This will be another great build Bernard, that motor is perfect - Thanks
|
|
|
|
Post by BERNARD "HOT ROD" KRON on Oct 16, 2012 0:14:23 GMT -4
Thanks Rick. More progress – lots of rough and ugly hacked plastic. The interior panels have been cut. As mentioned earlier, they are based on the Revell 5-window Deuce kit’s floor panel, dashboard, and door panels. Replicating their basic shapes in .020” styrene sheet has increased the piece count from 4 to 7. The parts will be painted in an appropriate shade of steel or aluminum metalizer to imitate the look of a bare metal interior. 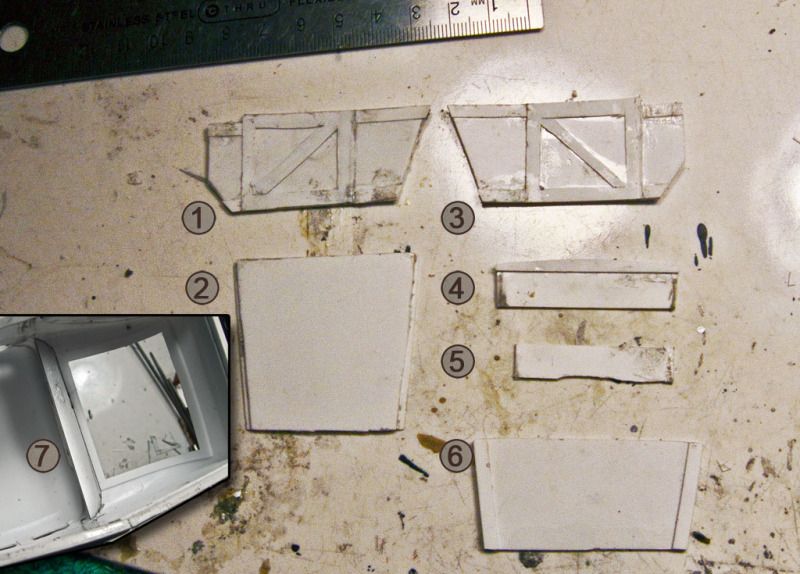 1 - Right interior Panel, 2 – Floor, 3 - Left interior Panel, 4 – Dashboard, 5 – Kick panel, 6 – Rear interior panel, 7 – Package shelf. 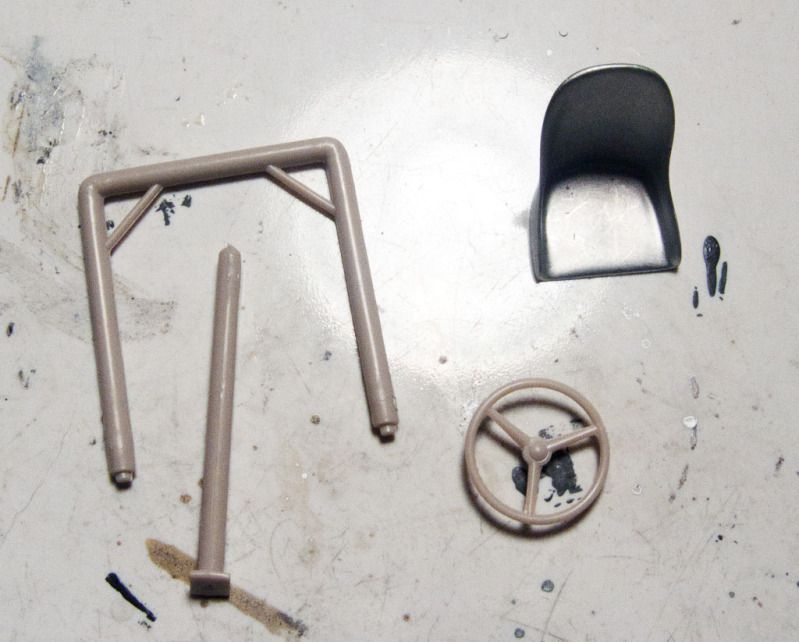 Interior details: The roll bar and steering wheel are from the AMT ’37 Chevy coupe kitm the bucket seat courtesy of ThePartsBox.com In addition I did some work on the grill shell assembly. I removed the backing panel for the radiator. The car will have no radiator. Instead it will have a coolant tank located in the rear of the car with the fuel tank and run coolant lines to the engine block. In the completed build you will only see the coolant lines with the tanks hidden in the non-opening trunk. The photo below shows the front view of the grill shell with the blank grill panel from the kit to its left and, finally, the rear view of the shell showing the panel in place. 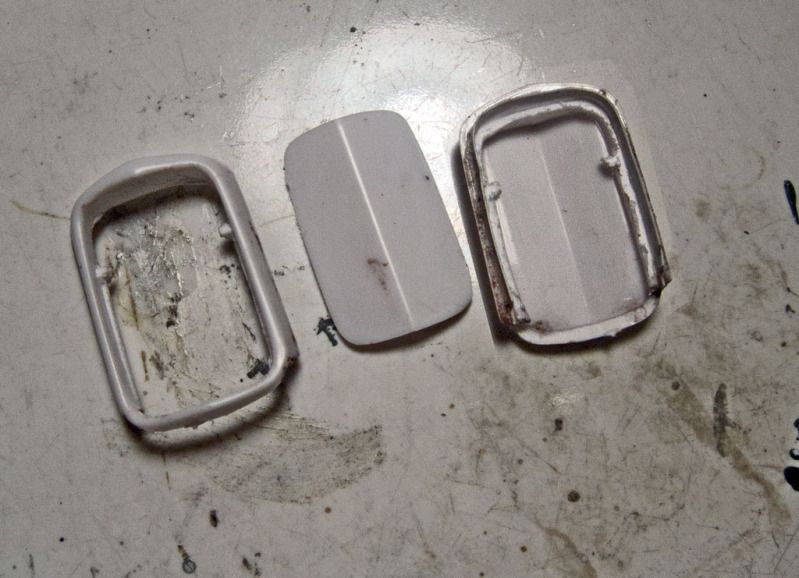 |
|
|
|
Post by BERNARD "HOT ROD" KRON on Oct 20, 2012 12:27:52 GMT -4
I’ve gotten the basic color down on all the body parts. Besides the overall design and stance of the car, color is one of the keystone elements that defines a project in my mind’s eye. It’s critical enough that I will almost always shoot a test of the actual sequence of primer and colors before proceeding with the build. This one is pretty simple since it consists only of Duplicolor white primer and Krylon Bauhaus Gold with no contrasting second color other than those that will be supplied by the decals (where my intention is to emphasize simple red lettering and trade decals). Once I’ve shot the basic colors I’ll usually photograph a color check, both because I generally post my builds on line, and because photographs have a tendency to objectify the model, kind of like stepping back and squinting at it to more clearly capture the overall look. In any case, this color turned out to be quite difficult to photograph successfully. My camera made it look too much like a bright yellow and it took some manipulating of the shade in Photoshop to get it right. The second of the three photos below captures the shade most successfully. My idea was to come up with a typical simple race car color of the sort seen at Bonneville in the late 50’s and early 60’s. I think this shade is fairly appropriate. Thanx for lookin’, B. 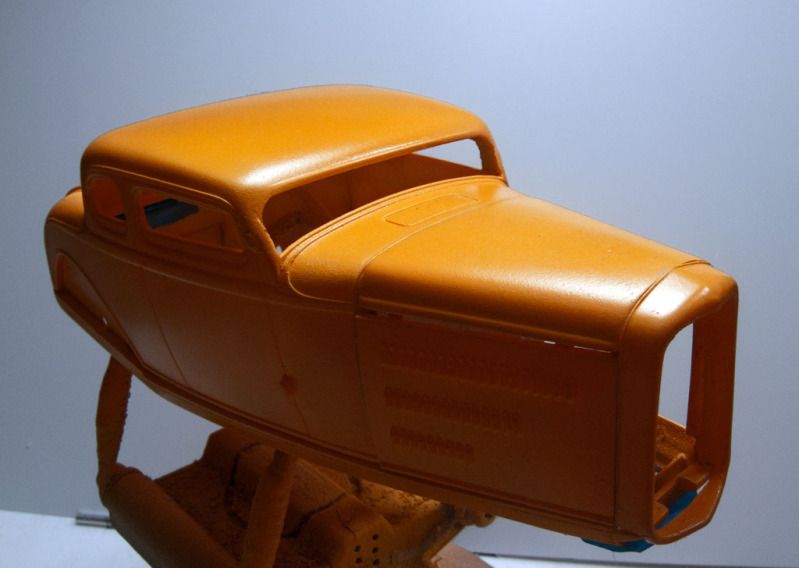 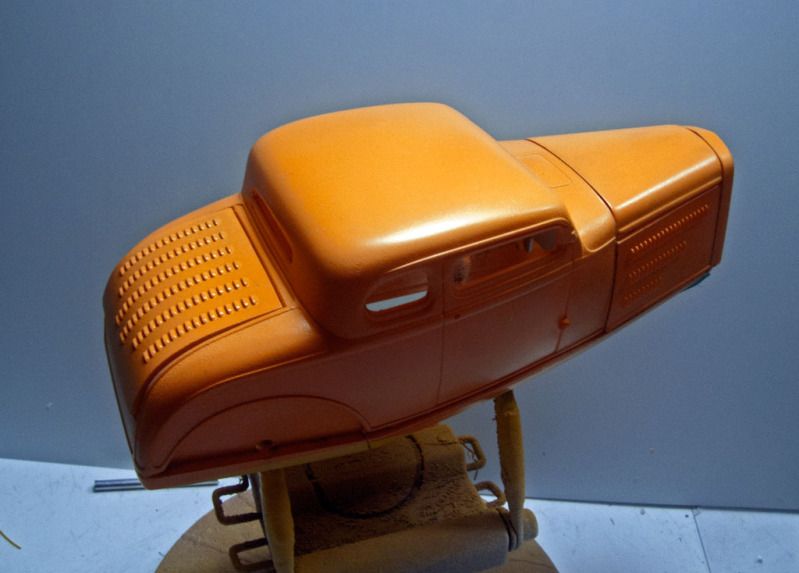 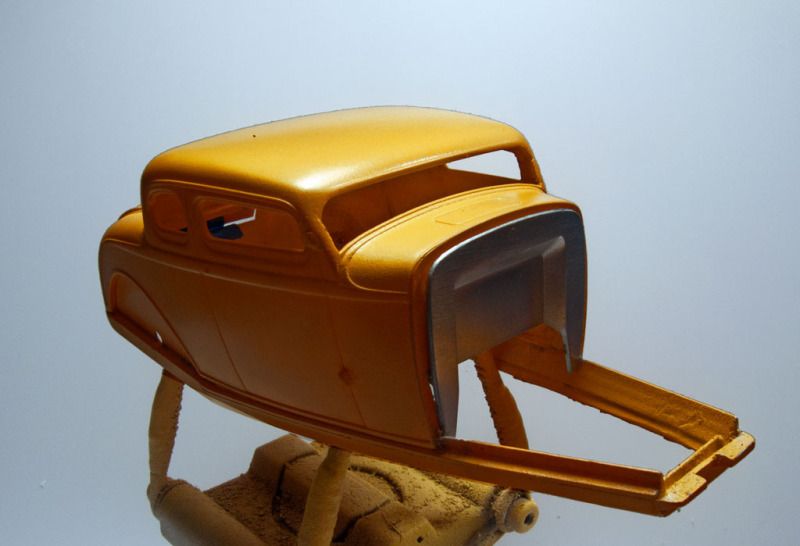 |
|
|
|
Post by BERNARD "HOT ROD" KRON on Oct 23, 2012 22:42:38 GMT -4
I designed some decals for the car. The fictitious sponsor is Avalon Racing Services in Long Beach, California. Avalon is a small town on Catalina Island and Long Beach is the main industrial city facing Catalina on the California coast. The red in the Photoshop mockup below is brighter than the decals will be due to the transparency of the inkjet printing on the clear decal stock I’ll be using. I’ve run in to some incompatibility between the Krylon color coat and the Krylon gloss clear I’m using as a sealer. It causes crazing, much in the way a lacquer would when sprayed over an enamel. This was totally unexpected. Fortunately I had only sprayed the hood and grill shell when I ran into the problem. The hood has had to be stripped but the grill shell can be rubbed out to save it. I’ll try some Testors enamel clear in the hopes that it will solve my problem. Thanx for lookin’, B. 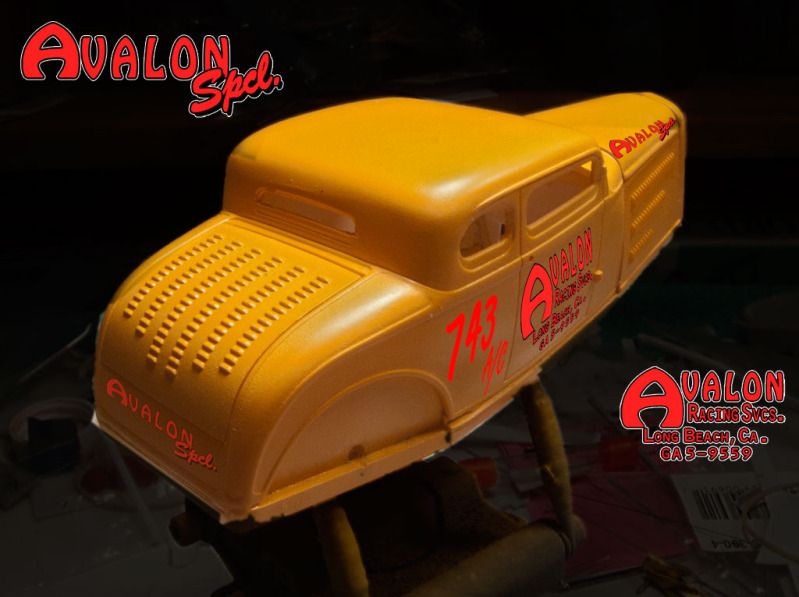 |
|
|
|
Post by KRAZY RICK on Oct 24, 2012 9:03:44 GMT -4
Nice Bernard ,the color looks great on her.
|
|
|
|
Post by BERNARD "HOT ROD" KRON on Oct 28, 2012 20:55:09 GMT -4
Thanx Rick! Progress on this build is slow be steady. I got some Testors Modelmaster No. 2936 Clear Top Coat which is Testors’ only true enamel clear in a rattle can. It seems to have solved the crazing problem I had. I generally use lacquers so I’m unaccustomed to the slow cure time for enamels. I tried polishing an area of my test panel after 24 hours and the paint, while hard enough to stand up to a light polishing , seemed a bit soft so the result was somewhat milky. I’ll give the final coats a good 5 to 7 days before polishing. I created final decal art which required modification of the “Avalon Spcl.” logo to fit properly on the rear panel below the trunk. Otherwise the proof pieces laid out properly. I’ll probably print and apply the decals tomorrow, which means the final clear should go on Tuesday. Final polish and assembly should happen in about a week to 10 days. Meanwhile most of the sub-assemblies have been painted. I decided to give the belly pan a polished aluminum finish. I scored some panel lines into the pan to represent the three panels that would be removable on the 1:1. During final assembly I’ll apply some Dzus fasteners in appropriate places to “secure”” them. I also cut some relief holes along the sides of the bellypan for the exhaust pipes which exit in front of the rear wheels. 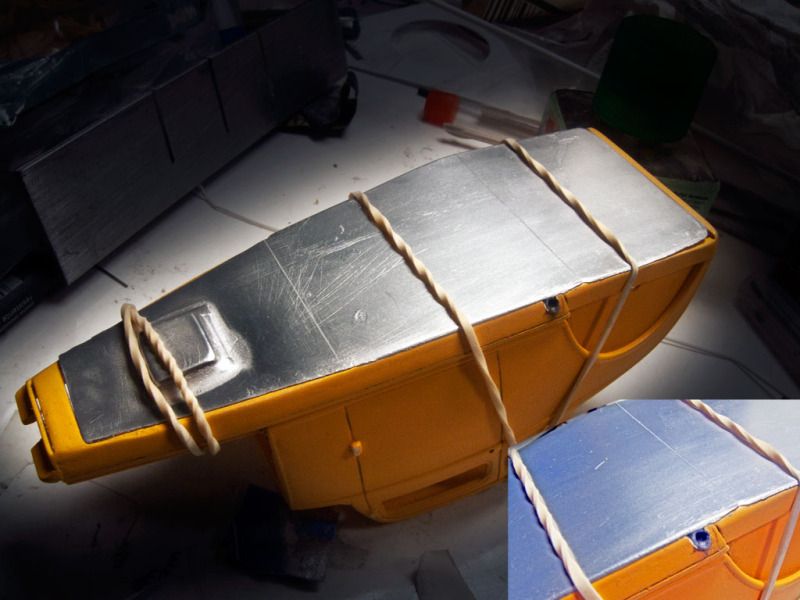 I bought some transparent red acetate for the windows and decided to make a matching see-through grill panel as well. This was a popular thing to do in the late 50’s and early 60’s. Hopefully the front of the blown Nailhead will be visible through the panel on the finished model. (and yes, I will strip and re-finish the grill shell…) 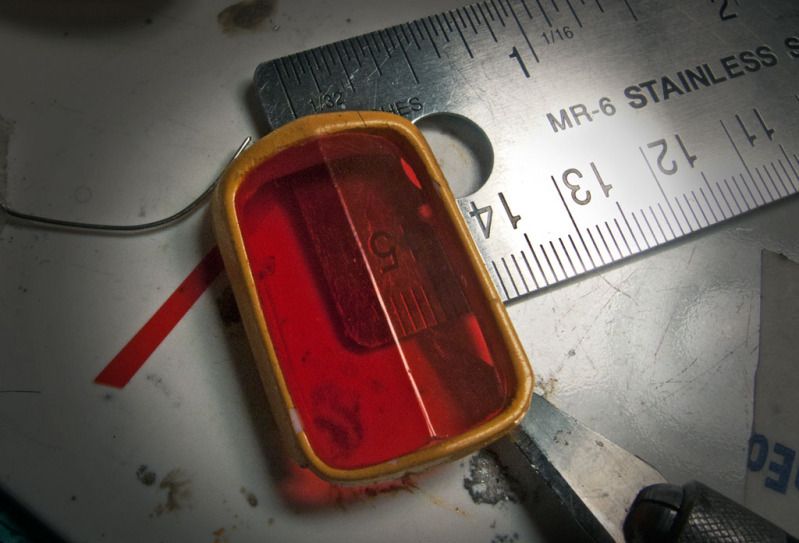 And lastly, most of the interior panels are painted in Metalizer Aluminum Plate with the rill bar done in black semi-gloss. I still have to apply p/e gauges to the dash and fabricate a steering system. Along with some engine wiring and plumbing, this is the only mechanical work left to do on the car. 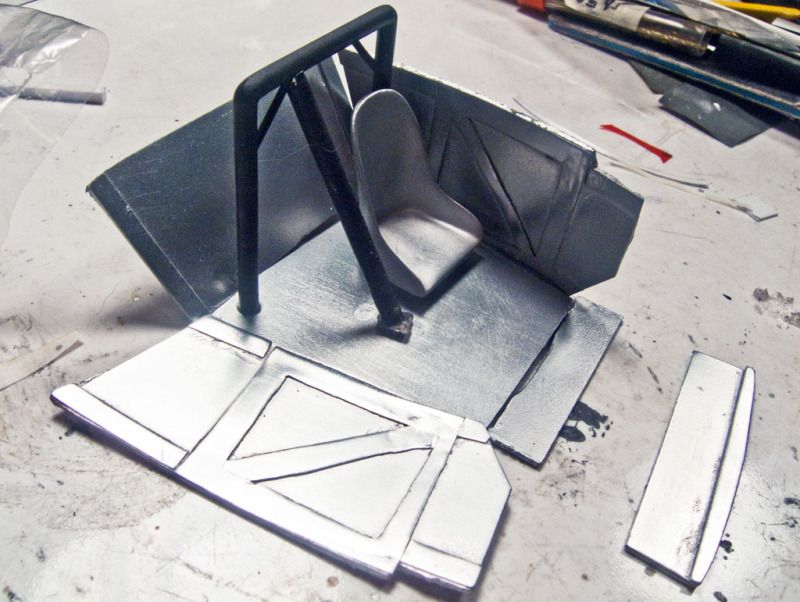 I hope to have this project wound up in about two weeks, barring any late-stage disasters… Thanx for lookin’, B. |
|
|
|
Post by KRAZY RICK on Oct 28, 2012 21:37:43 GMT -4
This is going to be outstanding Bernard, the details are really going to make this one special
|
|
|
|
Post by BERNARD "HOT ROD" KRON on Oct 30, 2012 16:59:40 GMT -4
Thanx Rick! I got the decals and clear succesfully applied. After a few days to cure I'll start final assembly. I'm really looking forward to seeing the impact on the appearance of the red plexiglas windows and grill. Thanx for lookin', B. 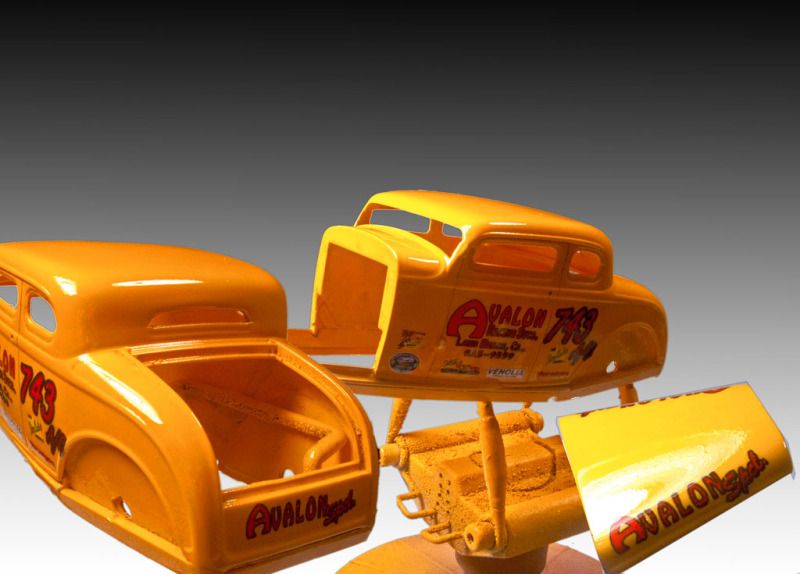 |
|
|
|
Post by KRAZY RICK on Oct 30, 2012 17:12:26 GMT -4
That red glass will really jump out at ya, with the body color & decals !!
|
|
|
|
Post by BERNARD "HOT ROD" KRON on Nov 3, 2012 21:11:42 GMT -4
Thanx Rick! The interior is completed and installed. In order to get that done the red Plexiglas windows had to be installed as well. There was a very specific sequence in order to get everything squeezed in. Once the floor is glued in place the interior will largely be invisible due to the mail slot windows and the fairly dark red Plexiglas. The steering wheel is from an AMT ’37 Chevy. Here’s a composite picture of the interior details during final assembly including the firewall which had to be glued in position in order to locate the kick panel. Next stop, final engine detailing and installation, then steering and suspension details. Shouldn’t be too long now… Thanx for lookin’, B. P.S. As I look at this I notice I’ve omitted the shift lever. I’ll install it now since I actually haven’t glued the floor assembly in place. Phew!...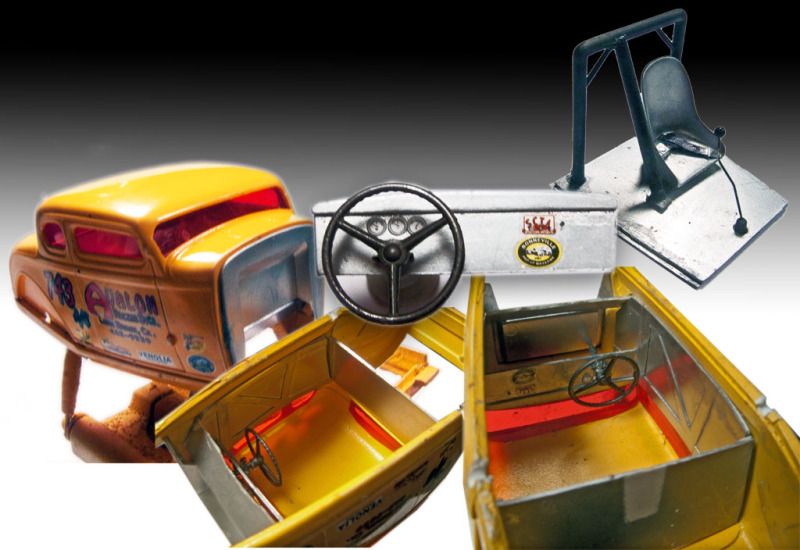 |
|
|
|
Post by JOE66 on Nov 5, 2012 14:29:26 GMT -4
Simply outstanding!!
|
|
|
|
Post by BERNARD "HOT ROD" KRON on Nov 14, 2012 2:39:09 GMT -4
Thanks! I’ve gotten the motor completed and installed and the interior and bellypan installed. The bellypan required some internal bracing to be fabbed to provide adequate glue points so it would sit properly in place. Left still to do prior to final assembly are fabricating and mounting the front suspension and steering details. Below are pictures of the bellypan and motor. Thanx for lookin’, B.  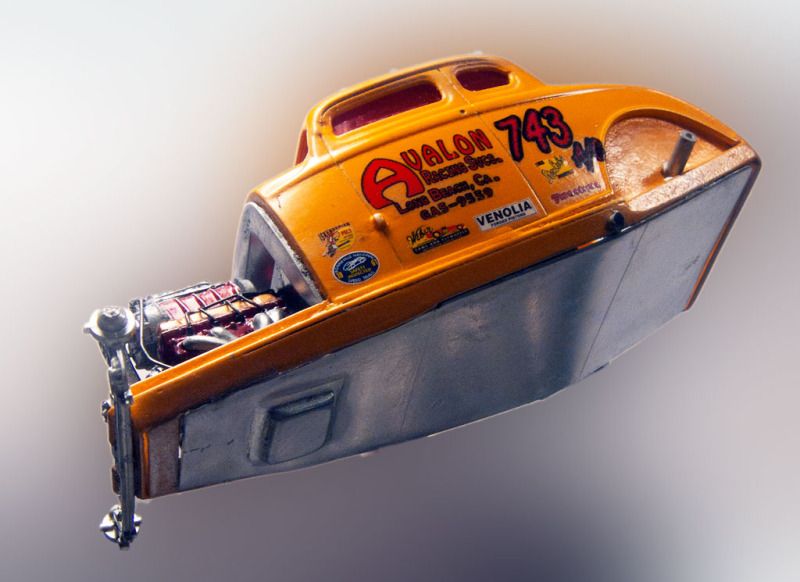 |
|
|
|
Post by KRAZY RICK on Nov 14, 2012 5:47:51 GMT -4
Looks super Bernard !! - The engine colors are nice & the belly pan is right at home  |
|