|
|
Post by BERNARD "HOT ROD" KRON on Jul 13, 2014 23:27:58 GMT -4
Ford ’27 T buckets are relatively rare in the scale model world. The main reason for this is because there are no kits and very few supporting parts for them. Virtually everything must be either kit –bashed or scratch built. This is ironic because resin re-pops of some mysterious and, as far as I’ve been able to find, undocumented donor model are commonly available from several different resin vendors. IMHO far and away the finest resin 27 T is made by Altered States Models: super crisp, styrene-like and with a very nice partial firewall detail. This is the basis for this project. I’ve been wanting to build a ’27 T highboy for a long time. There are 3 influences that I’ll site, 2 I think are each exceptional in their own way, and one that is iconic and which I have never liked. The icon is the George Barris Twister T, AMBR winner in 1962. For me this car is a bad dream with a sky high stance and countless details which crash into each other in a most unpleasant fashion. Unfortunately, like many bad dreams, this one remains firmly entrenched in my memory and has been since I have been a boy. Making a list of what needs to be corrected on this car will lead to a very nice 27 T highboy indeed. The Barris Twister T:  Most closely related to the Twister T, indeed in many ways the Barris car “done right”, comes out of Roy Brizio’s shop in the early 90’s and featured in Volume 1, No. 1 of The Rodders Journal. Classic Brizio in every way, and an indicator of what was to be the “TRJ Look” in the years to come, it’s immaculate, period correct, and tasteful. Built for James Stroupe, pictures of it are virtually non-existent on the web, so these are scans from my copy of TRJ. The Stroupe ’27 T Hiboy: 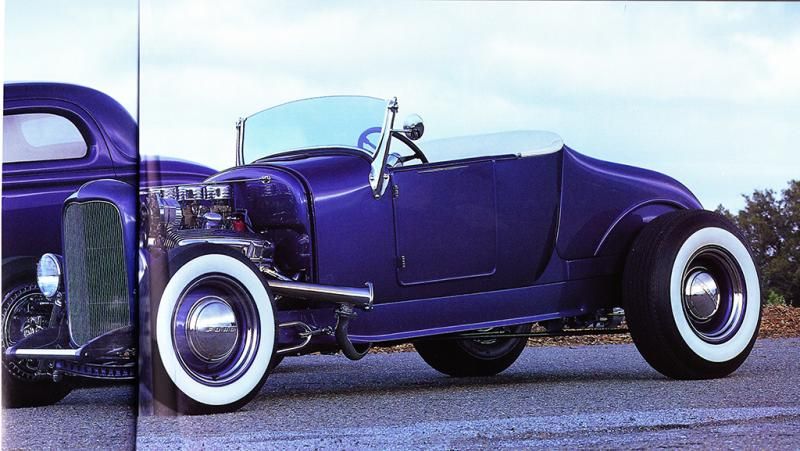 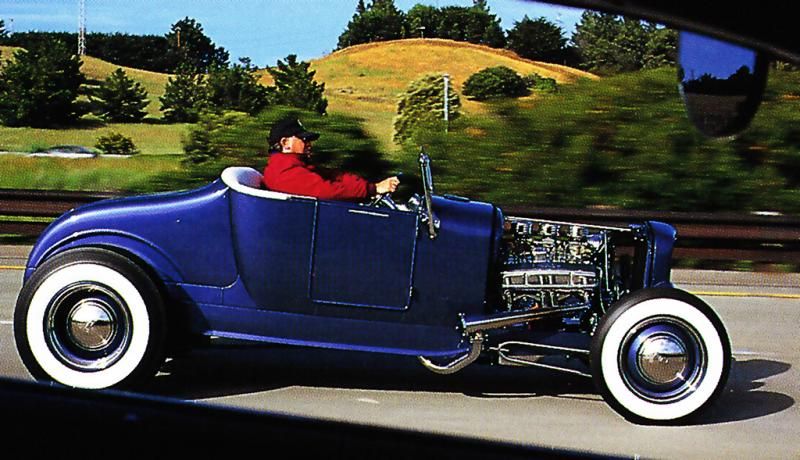 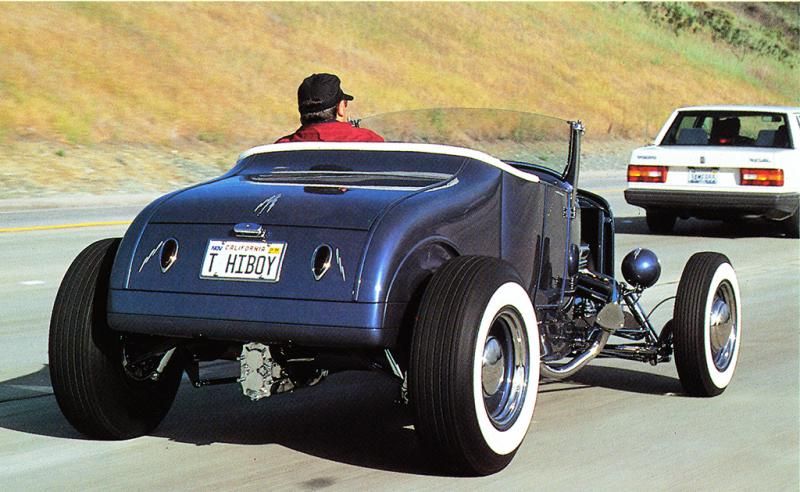 And finally, probably my favorite, the ex-Dennis Lacy car first made known to me by Dennis a few years back with a magical photo of the car at Big Bear. The polar opposite of the Stroupe car, but a deadly serious period hot rod and no aRt Rod in any way. Loaded with authentic pre-’48 parts and a full house flattie, what makes this car special to my eyes is the perfectly balanced stance, a true highboy in character, but graceful and sleek nonetheless. These are the only pictures I was able to find remaining on the net that show the car to advantage. The stance of this car is where I would like to go, but perhaps with a somewhat later period in finish and detail. The Dennis Lacy ’27 T Highboy: 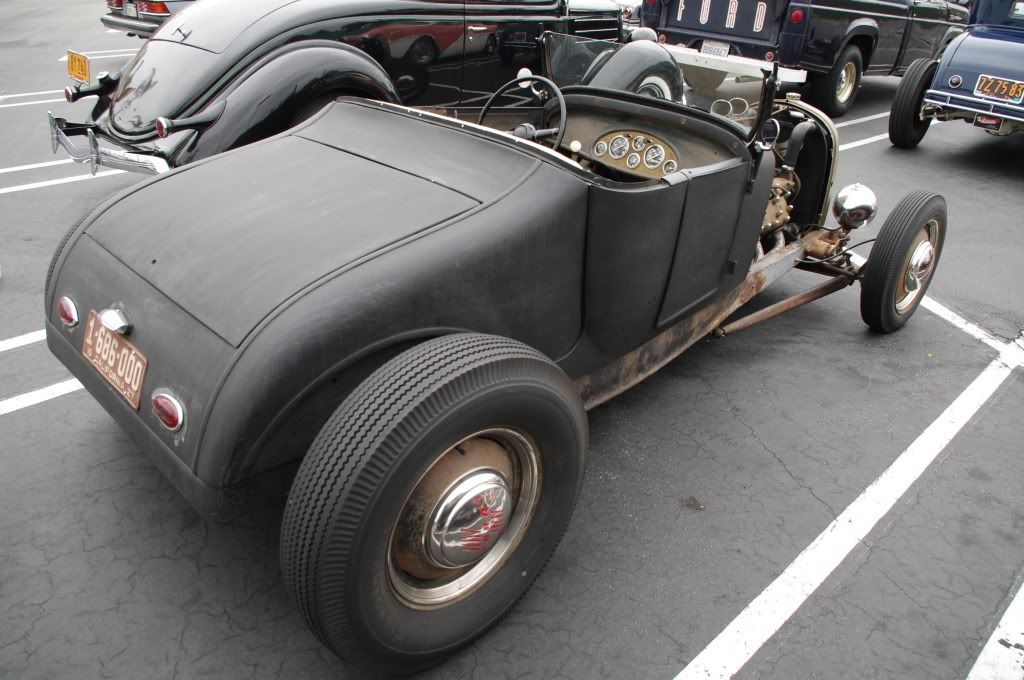 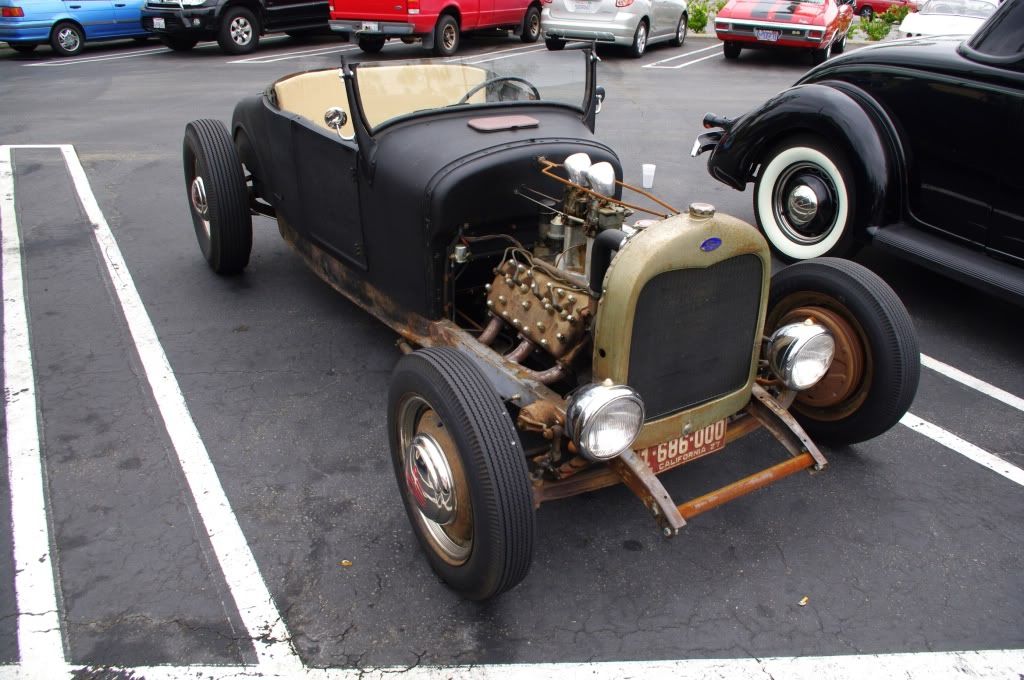 So now to the job at hand. I’m trying not to let this project get away from me, so I’ve decided to let it’s Revell Deuce roots show through somewhat. The frame is Revell Deuce, and quite likely much of the suspension will be, too. The most difficult thing about doing a resin 27 T is that no interiors exists for the car. So if you’re going for a proper tuck ‘n’ roll interior you have a challenge ahead of you. In my case I’ve found a way to adapt the Revell side panels and bench seat from the original Highboy ’32 Ford issue. The chassis is z’d at the rear in an attempt to achieve some of the balance of the Lacy car. So far I have no wheels/tires or suspension on the build so we’ll see how that goes. I’m planning on a Deuce grille shell so my car will be quite different. I’m shooting for some sort of period OHV V8, probably with a fair bit of chrome to pay to my recurring Twister T nightmare. I’ve done a ton of Caddy powered rods so it will quite likely have to be something else.. Below are the initial build pics. Thanx for lookin’, B. 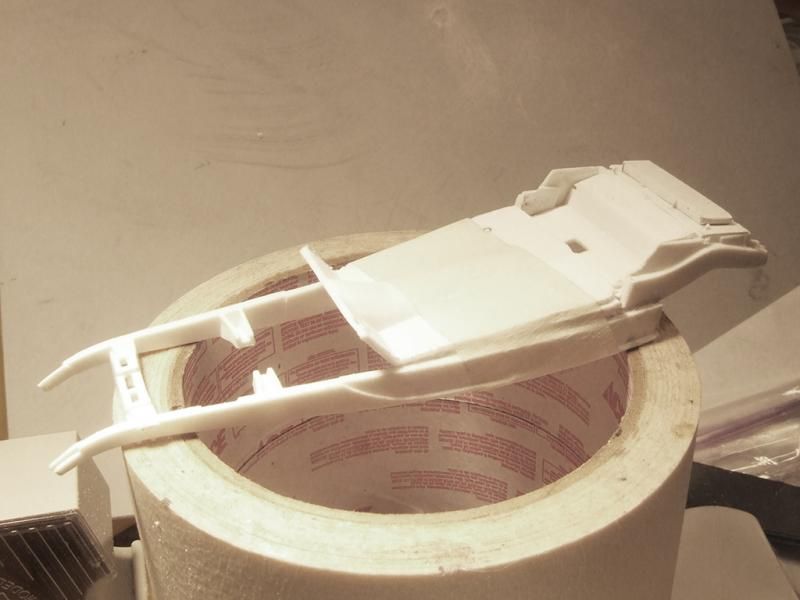 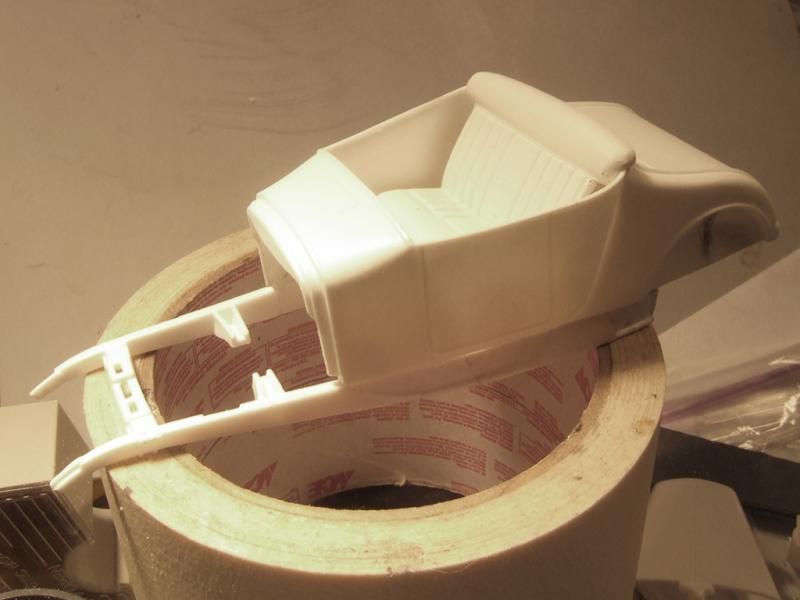 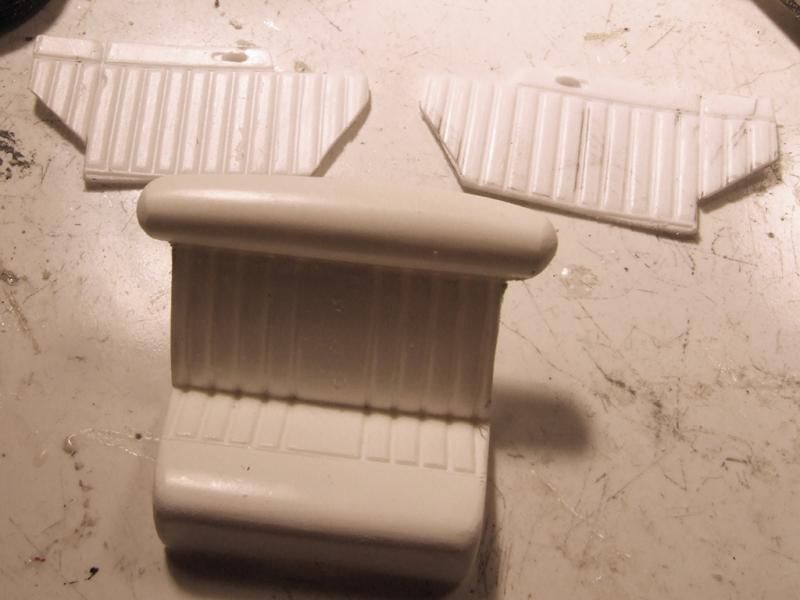 |
|
|
|
Post by KRAZY RICK on Jul 14, 2014 4:25:40 GMT -4
Looking forward to seeing this project of yours Bernard
|
|
|
|
Post by BERT "THE CRUSHER" on Jul 14, 2014 10:32:49 GMT -4
That's great info. Bernard. I'm looking forward to the build.
|
|
|
|
Post by 41CHEVY on Jul 14, 2014 11:40:04 GMT -4
I thought I was the only one who has recurring nightmares of the Barris T  I like what your plans are for a different engine also, you know me with odd engines. Be nice to see an Olds, a Buick a Pontiac 4 or a Ford Y block for a change. Paul |
|
|
|
Post by BERNARD "HOT ROD" KRON on Jul 15, 2014 21:05:53 GMT -4
Thanx guys! The interior pieces are now completed. There’s still a bit of smoothing and polishing to do but I’m confident the fit is good and it’s time to move on to the stance and chassis setup so I can get an idea of what I have going on here. The bench seat and side panels are Revell ’32 Ford Highboy pieces radically massaged to fit the much smaller ’27T interior. The side panels have been shortened, sectioned, curved somewhat, and trimmed to fit the sides of the ’27 properly. In the photos they’re held in place with tape so the fit, especially at the rear up by the top of the seat, is not as precise as it will be during final assembly. The bench seat had 3 pleats removed on each side and 1/8th inch half-round stock added and shaped to conform to the side of the cabin. The dashboard is the custom part from an AMT ’37 Chevy coupe kit, narrowed down and squared up to fit the ‘27’s cowl. Using a tuck and roll dash is an indication of the direction I’m headed in. I think I’ll be combining some of the early 60’s show car aspect of the Twister with the more conservative vibe of the Stroupe car but with the sleek stance of Dennis’s roadster. Thanx for lookin’, B. 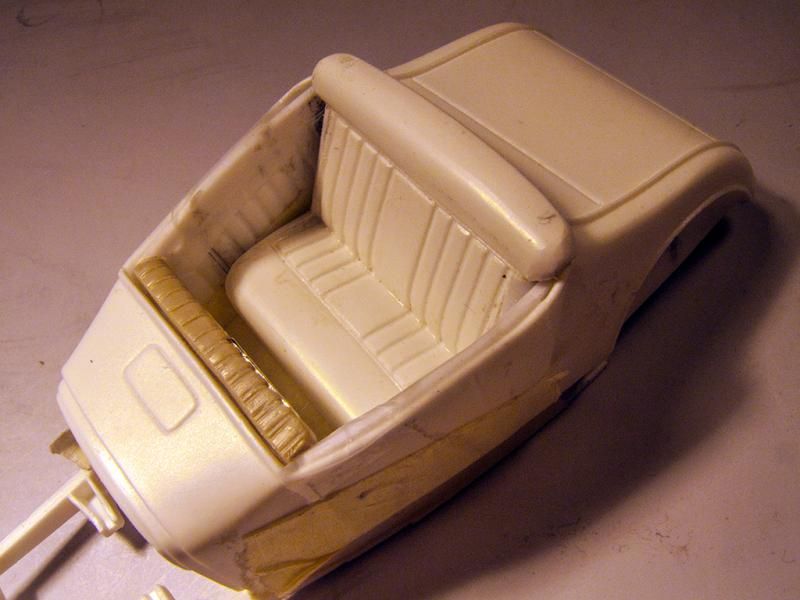 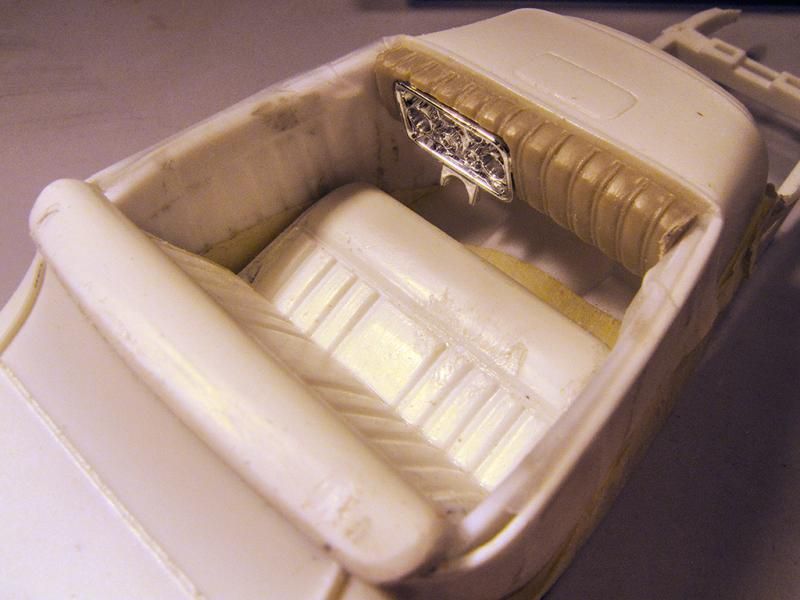 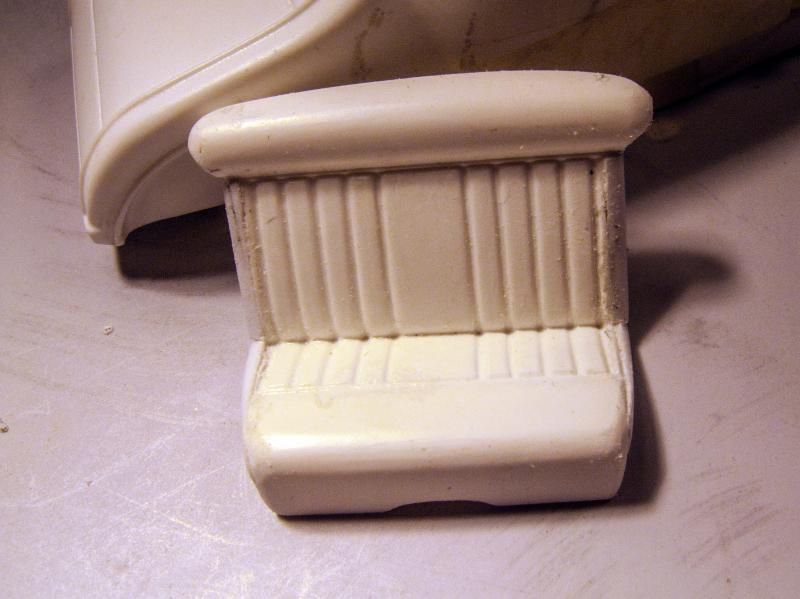 |
|
|
|
Post by KRAZY RICK on Jul 16, 2014 2:29:27 GMT -4
What color are you planning for this Bernard ?
|
|
|
|
Post by BERNARD "HOT ROD" KRON on Jul 17, 2014 20:06:52 GMT -4
I don't know what color yet, but now that I can see the stance and have made some preliminary choices of tires, wheels, etc. I know it will be a metallic or candy and the car will have plenty of chrome. I performed my usual fettling on the Revell ’32 Ford front suspension, a variation of the Tim Boyd Drop (Thanx Tim!) where you narrow the spring-mount tab to lift the front suspension closer to the crossmember. I also removed two spring leaves and notched the rails at the front crossmember to lower things some more. The rear suspension is essentially at the stock height, the lowering coming from the approx. 4 scale inch Z-job. Below are a couple of stance check photos with the tires I’m going to use (from Modelhaus, T-120 fronts and I-lost-the-label-on-the baggy-so I-don’t-know rears). There’s virtually none of the rake of the Stroupe car but not it’s not quite as low as the Lacy car. The last photo compares the two bodies with the leading edge at the firewall flat to the ground. You can see the enormous difference in size of the two with respect to cowl height. I make the Deuce almost 8 scale inches taller in that dimension compared to the ’27 T. This will require a chopped grill shell to get a proper line from the cowl. I was planning on using a Moder Car Garage p/e grill anyway and they can be ordered with either 4” and 6” chopped shells, one of which should do the job. You’ll notice that that the Stroupe car has a chopped shell, but I think I want a bit more shell showing between the front rails so I’m guessing I’ll opt for the 4” chopped version. Now that the basic stance is established it’s time to fill the space in front of the firewall…. Thanx for lookin’, B. 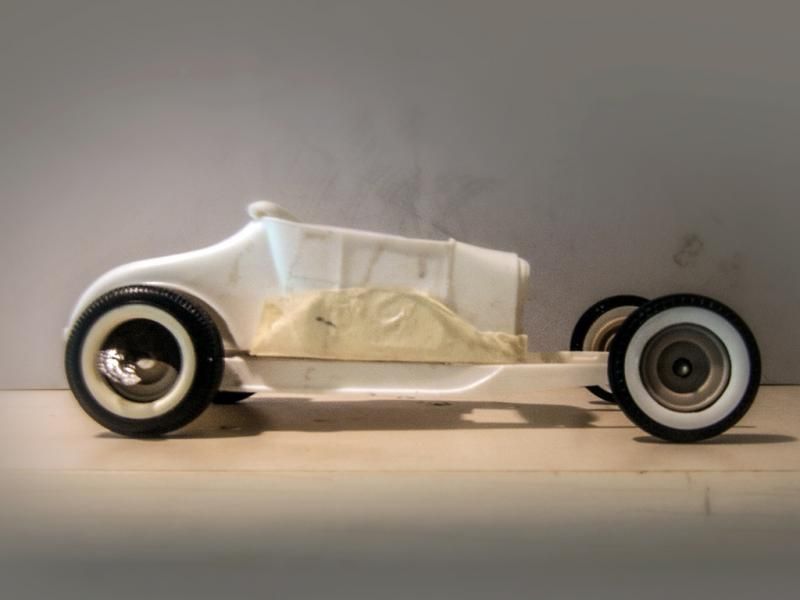 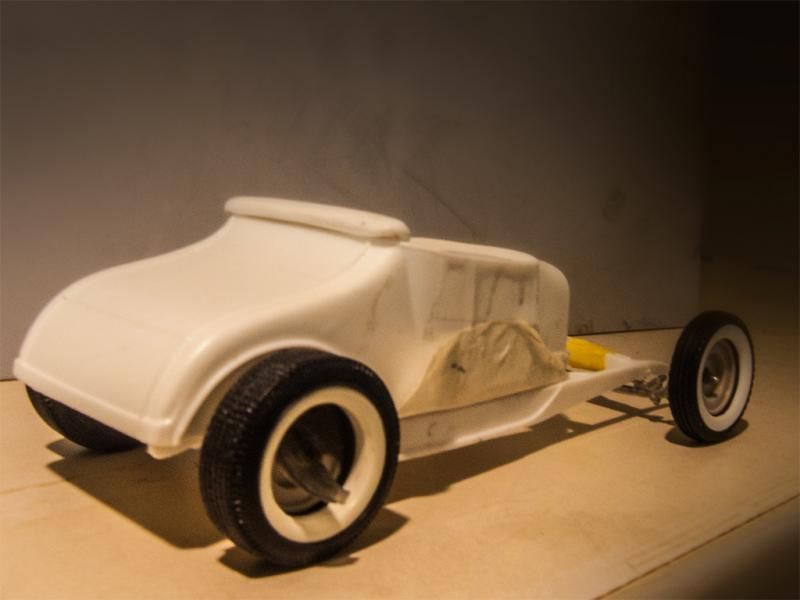 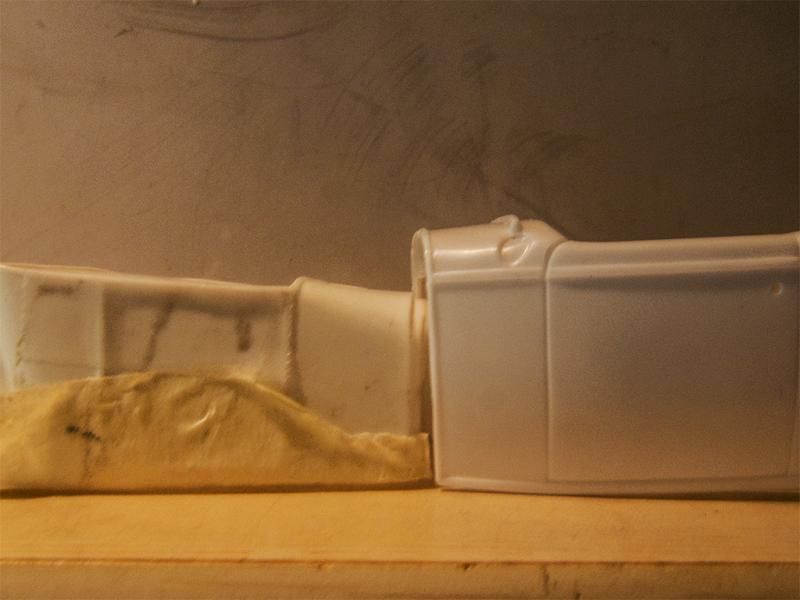 |
|
|
|
Post by KRAZY RICK on Jul 18, 2014 8:01:29 GMT -4
Great start - nice stance
|
|
|
|
Post by BERNARD "HOT ROD" KRON on Aug 5, 2014 3:16:16 GMT -4
An update at last! With no basic kit to draw on everything needs to be kit-bashed or scratch built so progress is slow with lots of “two steps forward and one step back”. I have built the motor. I decided to go the “Ford in a Ford” route, something I virtually never do. I like the look of the Y-block Ford V8s with their well-defined valve covers, especially the look of a full-dress ’57 T-Bird 312 4-barrel. I was going to use the AMT version but didn’t care for the typically “soft” AMT molded-in detailing on the block, so, instead I made a fake-o Y-block using one of the countless small-block Fords I have left over from an equally countless number of Revell Deuce kits I’ve used. I added material to the block below the pan-line to create the Y-block’s characteristic shape, squared up the heads to fit the T-Bird valve covers and detailed the ignition and accessories based on research done on the internet. All the chrome bits except the headers are from the AMT ’57 T-Bird. But I just couldn’t go with the trademark “up-and-over” Y-block headers. Instead I used a set of “limefire” headers from the Revell Roth Tweedy Pie kit. They may have been for a small-block Chevy, but they have the correct paired center ports and they line up perfectly. 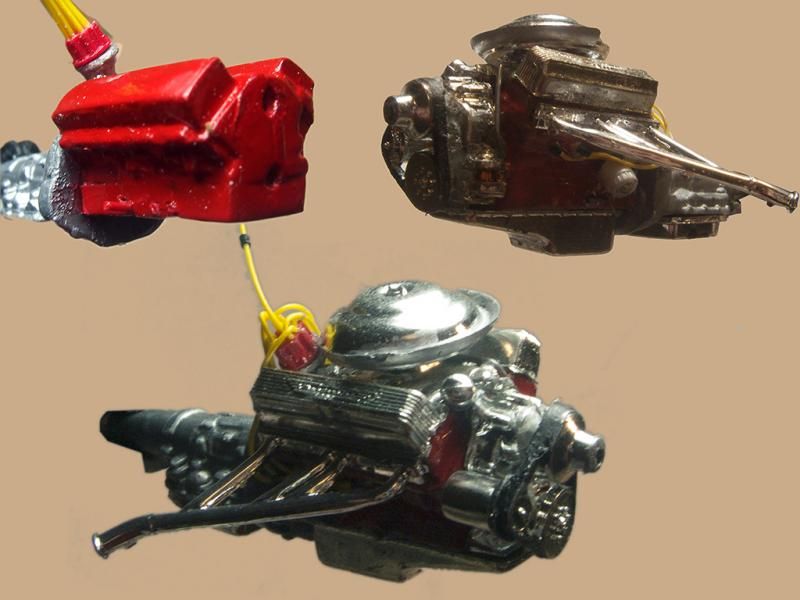 Also receiving attention was the bodywork. I’ve added a rolled pan at the rear to complement the line defined by the chassis rails. It was built up from styrene strip and quarter-round . I also fabricated a firewall using the inset part of a Revell Deuce firewall. 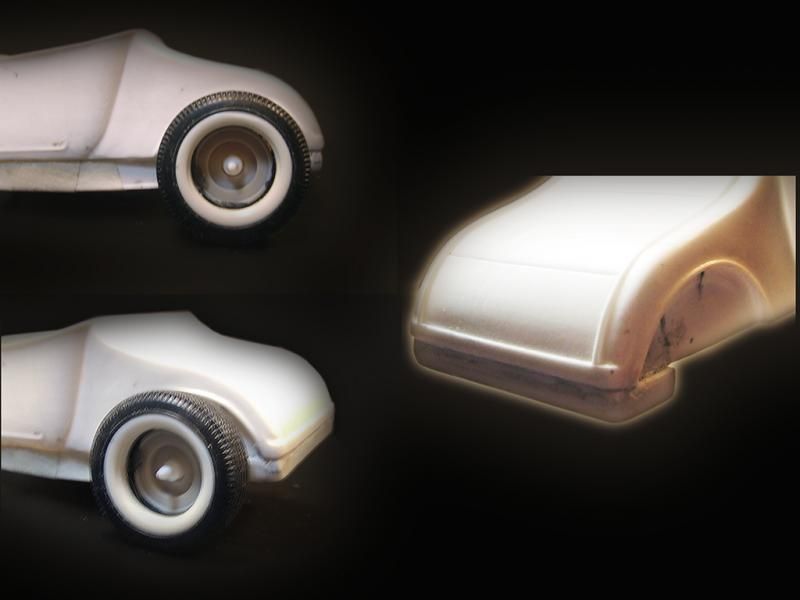 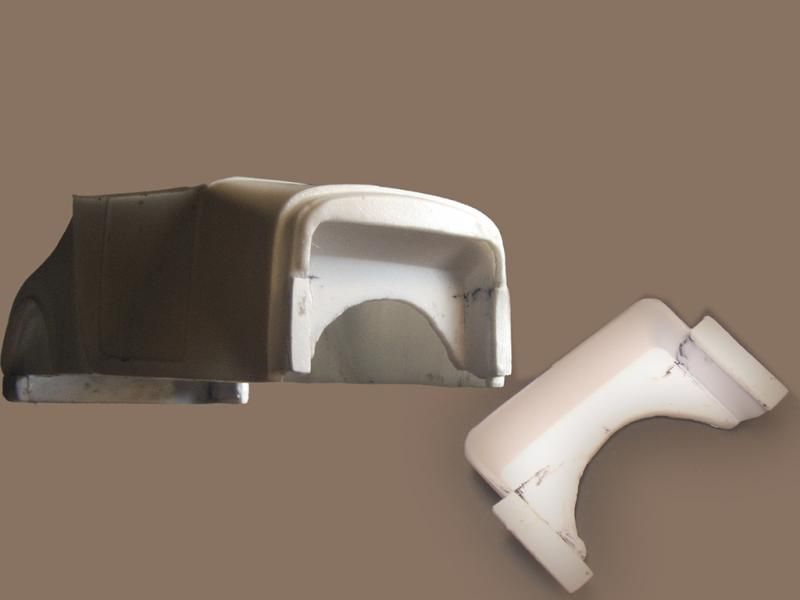 Next up is bodywork and paint, wheel choice, exhaust system, steering gear, and… Hopefully I’ll have an update sooner than last time. Thanx for lookin’, B. |
|
|
|
Post by BRITBOY on Aug 5, 2014 6:00:26 GMT -4
A Y block in a T? That's going to be quite a squeeze! That roll pan sets off the back end really well.
|
|
|
|
Post by 41CHEVY on Aug 5, 2014 12:46:54 GMT -4
I like the choice of the Y block. I have a few of the AMT 1956 and 1957 Ford ones saved for a future project. I agree on the T bird 312 it's soft on detail and it is also undersized. This T is looking to be a good mate for your Gold T "Rumble Rod". Paul
|
|
|
|
Post by BERNARD "HOT ROD" KRON on Aug 6, 2014 9:43:38 GMT -4
Thanx guys! A Y block in a T? That's going to be quite a squeeze!... Throughout the this project I'm reminded of what Dennis Lacy said about his 1:1 when he was working on it. He was constantly coming up against just how small the '27 is when compared to any later Roadster. In my case the Y-block will just barely make it with the exhaust headers just clearing the leading edge of the bodywork. |
|
|
|
Post by BERNARD "HOT ROD" KRON on Aug 9, 2014 20:31:43 GMT -4
While I’m waiting for my 4” chop p/e grille and shell to arrive from Model Car Garage I thought I would start on the paint. I’m going for an early 60’s show car vibe (the Barris influence in the project) so I thought I’d try my hand at a metalflake. I’ve experimented in this area before but this is the first time I’ve taken it all the way to an active project. I often use Duplicolor paints and one characteristic they all share, regardless if they’re solids or metallics, is that they are fairly transparent and very sensitive to the color and texture of your undercoat. I actually have done candy-like paints jobs using Duplicolor metallics over a gold or silver base coat. Duplicolor makes a range of heavily flaked transparent paints for the system called Metal Specks. I used Metal Specks Silver as the base coat for my flake paint job. The color coat is Duplicolor Medium Quasar Metallic. A bright medium blue. If you shoot it over a white base coat it is a very rich but brilliant medium blue, only a couple of shades darker than a French racing blue. But it’s so transparent that if you shoot it over a dark primer like a red oxide, or even a bright gold metallic, it will totally change color. Over red oxide it changes to a muddy dark olive blue green, and over gold it will show as a dark emerald blue-green metallic. What I was looking for was a rich, deep medium blue with a visible flake and strong metallic highlights. After experimenting with various combinations I settled on red oxide primer, followed by a base metallic coat of Metal Specks silver. The Metal Specks paint is also quite transparent with no toner in it, just metal flakes in a clear base. So it shows a bit of the red oxide to it. Fortunately there is plenty of silver flake to it so it gave me the color I was going after. Here are some photos taken in bright direct sunlight showing the progression of layers. The Metal Specks is quite coarse so I buried it in clear before moving on to the color coat. The base coat shot is the Metal Specks and three coats of Duplicolor Clear. Under artificial light the effect is a little more subdued. 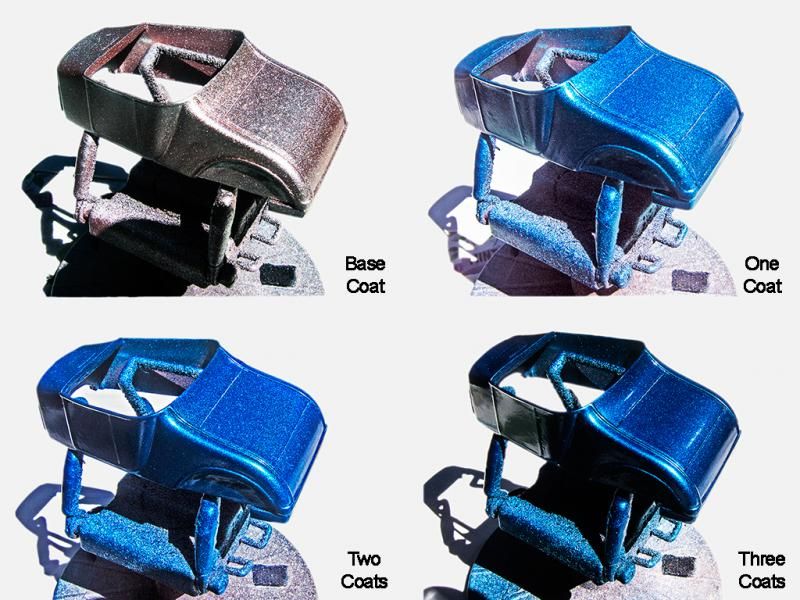 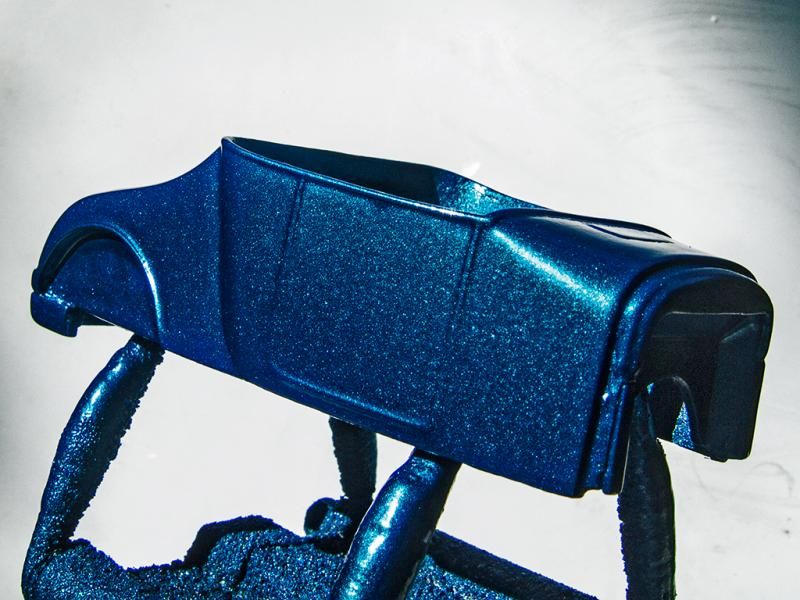 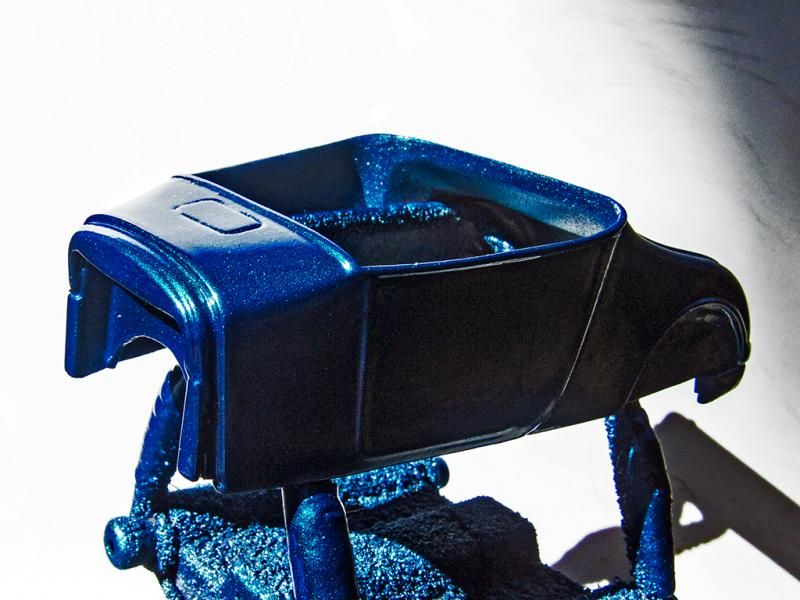 Next up is detailing and painting the chassis which will be body color with a white undertray and body color rear axle. Thanx for lookin’, B. |
|
|
|
Post by KRAZY RICK on Aug 10, 2014 17:01:22 GMT -4
I hate this damned computer - your pics weren't showing before !!! - I like that color & shade Bernard, it really suits this.
|
|
|
|
Post by BRITBOY on Aug 11, 2014 4:44:21 GMT -4
Now that's what I call a metalflake finish!
|
|
|
|
Post by 41CHEVY on Aug 11, 2014 11:23:10 GMT -4
Your color choice is perfect for your build!
Thanks for the Metal Flake info. I've been looking for a system that works in scale for a while. Paul
|
|
|
|
Post by BERT "THE CRUSHER" on Aug 13, 2014 17:32:01 GMT -4
Nice work, I am digging the flake. I'll have to check out this metal specks paint, of which you speak.
|
|
|
|
Post by BERNARD "HOT ROD" KRON on Aug 18, 2014 15:53:05 GMT -4
Thanks everyone! This project continues to offer up the kind of challenges I expect when I tackle a build largely outside the bounds of any one kit. While the core of the model is based on the Altered States resin ’27 T roadster and a Revell ’32 Ford chassis the radically more compact body shell and the early 60’s show car style I’ve chosen to depict demand a constant flow of adaptation and fabrication of various parts. But that was why I chose to do this subject and I’m very much enjoying the process. The main chassis fabrication is completed and the chassis painted to match the body work. In addition I’ve selected the wheels. They’re chrome reversed rims from the AMT ’51 Chevy hardtop kit. I made a wash using Testors Acryl Ford Engine Blue and isopropyl alcohol and painted the recessed areas to achieve a Barris Kolor Krome look. I will be using the chromed Corvette style steering wheel from the same kit and plan to give the rim the same finish. The tires are from Modelhaus, T120’s at the front and (I think…) T193’s at the rear. The interior panels are now painted in a two-tone combination of Duplicolor Oxford White with Duplicolor Wimbledon White highlights. The piping is .075” blue insulated hookup wire. The floor is finished in Wimbledon White. I’m still up in the air as to whether I will stick with the tuck ‘n’ roll dash or try something else. And last but far from least, I have an exact-fit windshield from an AMT ‘27T Touring Car which I have cut down to the lower panel. Here are some pics of the progress I’ve made. I also fabricated an exhaust system and installed it. Once I have the suspension pieces sorted out I’ll take some pictures of the completed undercarriage. That’s next up on my list. Final assembly can’t be too far away… Thanx for lookin’, B. 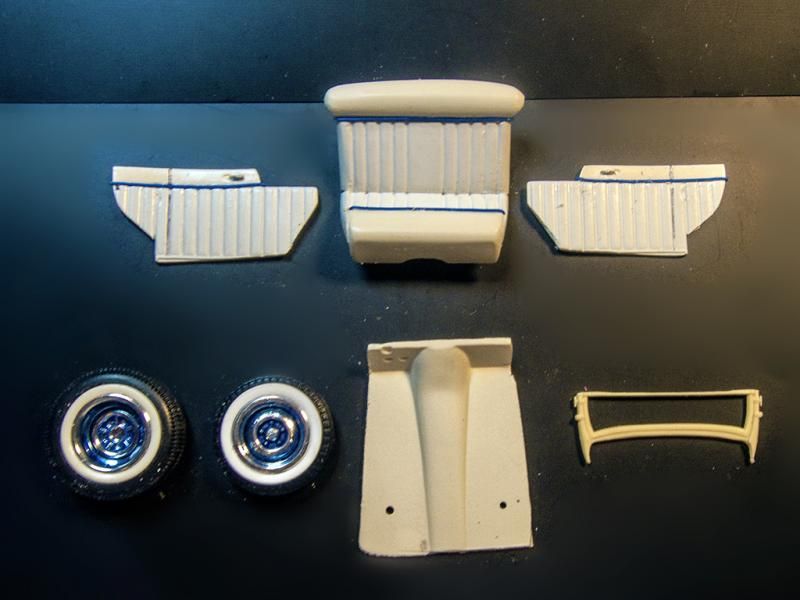 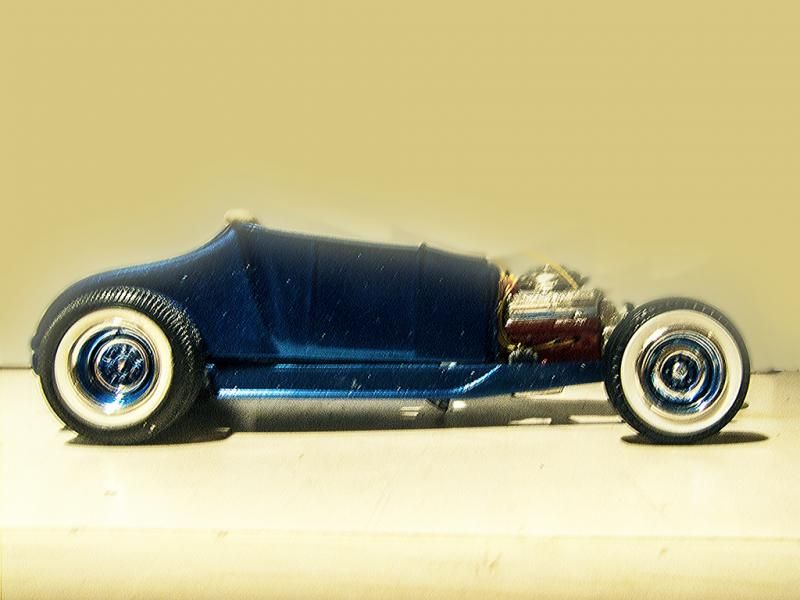 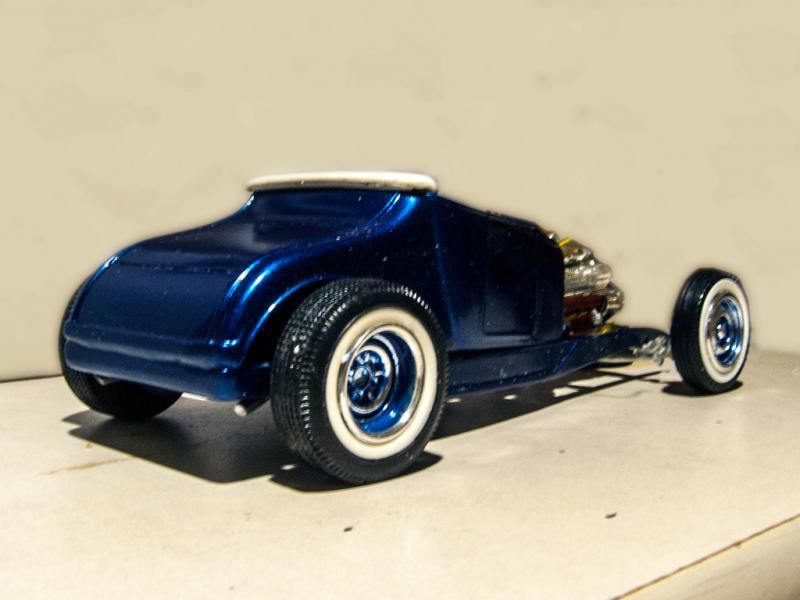 |
|
|
|
Post by KRAZY RICK on Aug 18, 2014 18:24:51 GMT -4
Nice progress so far Bernard  |
|
|
|
Post by DON on Aug 21, 2014 10:27:48 GMT -4
Graet looking build so far, I'm looking forward to the finished pics !
|
|


 I like what your plans are for a different engine also, you know me with odd engines. Be nice to see an Olds, a Buick a Pontiac 4 or a Ford Y block for a change. Paul


