|
|
Post by BERNARD "HOT ROD" KRON on Oct 29, 2014 8:14:19 GMT -4
I’ve started a new project based on the annual contest on another forum. This year’s contest is for any car the majority of whose parts are from the Revell ‘32 Ford 1/25th scale kits. With only a couple of months left to go I felt it was time to get started on my entry. My base kit is this: 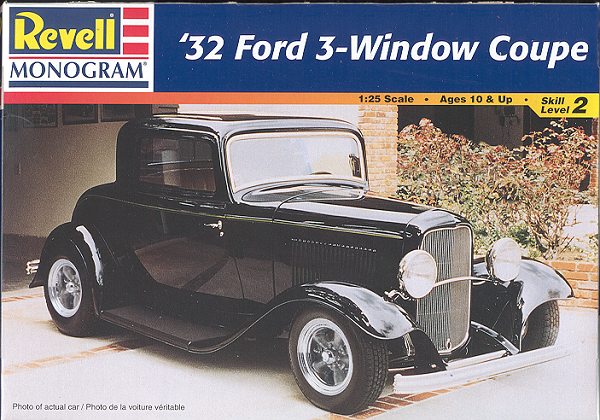 My intention is to use as many parts from the box as possible. I already know I'll be changing out the tires and wheels to Radirs and wide whites, and quite possibly the motor to a small block Chevy. The plan is to build a 60's era show-style chopped and channeled LoBoy. The suspension parts will be modified from the kit parts to allow for the lowered stance and the z'd rear end. The basic interior panels will form the basis for the upholstery, although I will most likely make custom tuck 'n' roll overlays on top of them. I'm not certain but I will perhaps use the bucket seats from the recent Stacey David Rat Roaster. Here's the basic work so far. The frame has been z'd about 4 scale inches at the rear. The front end has been dropped an additional 2 1/2 scale inches by shaving two leaves off the front spring and notching the frame rails at the front cross member. The top has been chopped about 4 1/2 inches. Despite the radical chop I managed to avoid a tiny "mail slot" rear window by cutting the window out and then re-installing it. About 2 1/2 scale inches were removed from the window opening height with the rest removed from the surrounding body material. The result is a rear window that's more in proportion to the side windows, giving the car a more balanced overall appearance. The body is channeled the depth of the frame rails, about 4 scale inches, and the firewall trimmed accordingly. I have my '49 Ford to finish but I plan to work steadily on this one to get it done before the deadline. Thanx for lookin', B. 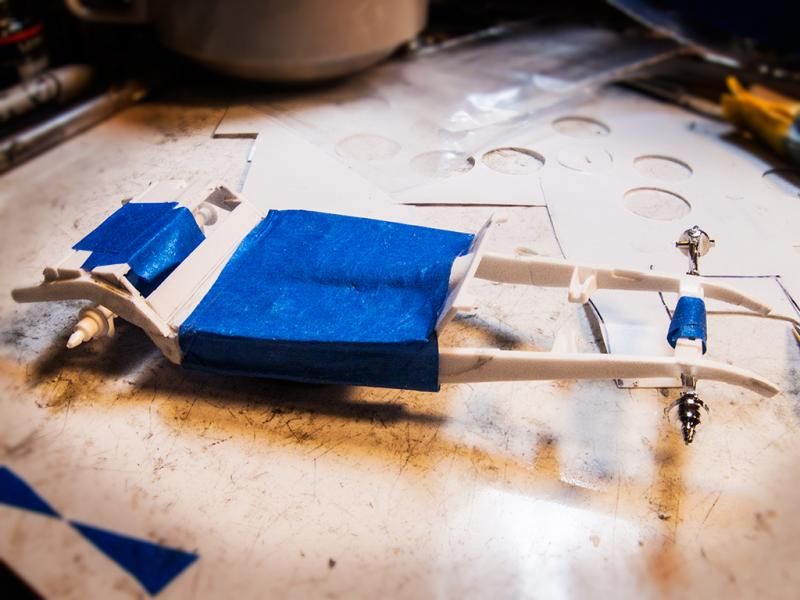 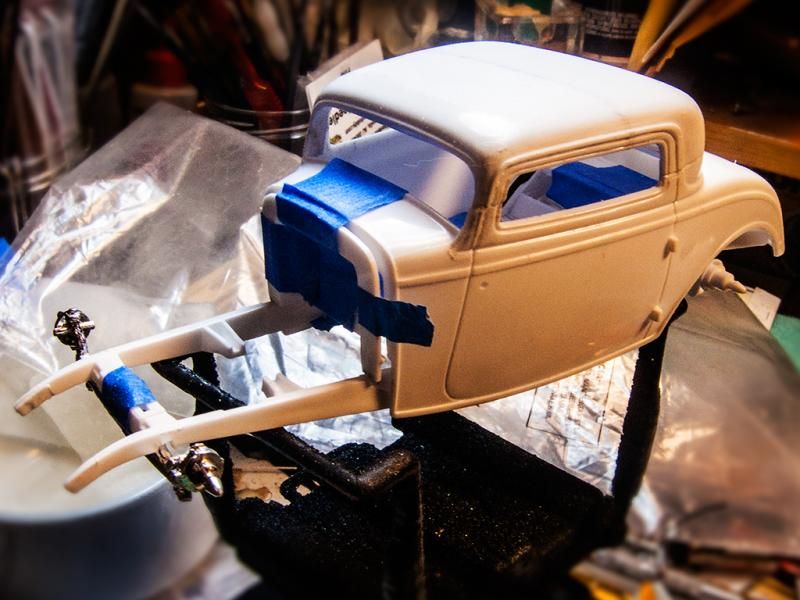 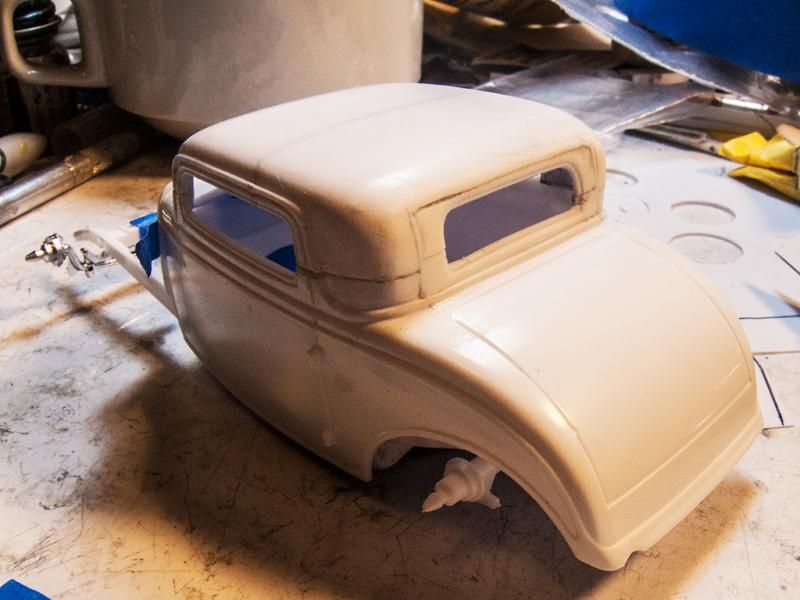 |
|
|
|
Post by 41CHEVY on Oct 29, 2014 13:46:18 GMT -4
Like how the rear window totally changes the look of the chop. Paul
|
|
|
|
Post by KRAZY RICK on Oct 29, 2014 21:26:19 GMT -4
When's this deadline Bernard ?
|
|
|
|
Post by BERNARD "HOT ROD" KRON on Oct 30, 2014 1:44:01 GMT -4
Thanks Paul. When's this deadline Bernard ? December 31st, so I have a couple of months. |
|
|
|
Post by BERNARD "HOT ROD" KRON on Nov 23, 2014 0:48:36 GMT -4
Despite not posting progress on this project for a while I’ve been progressing quite well. One thing about doing a chopped and channeled car is that there’s quite a good deal of “collateral damage” that needs to be accounted for. Add in a z’d back end and the work required to correct things increases even more. In this case the obvious areas include the interior, which needs to be sectioned, the rear fender wells which need to account for the raised rear axle line, and determining a way to accurately and positively locate the channeled body shell. Once you’ve done all that you can get back to your regularly scheduled programming, things like bodywork, paint and aesthetic and mechanical details (the actual interior design , motor, suspension, lights, etc.). Happily, I’ve made progress in all these areas. First up was determining a positive location for the channeled body shell. The Revell kit firewall was cut down and relieved to provide front mounting points for the body shell and clearance for the motor. An L-shaped strip of styrene supplies the location point for the rear of the chassis. The bodywork is finished, and despite the fact that I’ve chosen a candy paint job, seems to be clean and relatively invisible. The fender wells were adapted from the kit pieces and clearanced to allow for the new rear axle position. All the seams were filled with styrene, sanded smooth, and then treated with a skim coat of body putty. The primer is Duplicolor Sandable White. The basic paint is Tamiya TS-73 Clear Orange over Testors Pure Gold lacquer. The result is an intense Kandy “Old Gold” color rather than the greenish Testors Inca Gold frequently used. Test shots show that only the recently re-introduced Tamiya TS-13 Clear Gloss seems to be compatible with the color coat. Other lacquer clears thin the underlying Tamiya TS-73 and create runs and light spots. I have yet to apply the final clears so I’m still nervous about possible flaws. The chassis itself was trimmed and styrene strip panels fabricated to fill the areas left open as a result of the z’d frame and of shortening the rear frame ends to allow the frame to set inside the trunk area. Then I trimmed the stock gas tank so it would fit inside the rear trunk panel. The kit interior was sectioned by removing the depth of the channel job, slightly more than 4 scale inches, from the bottom of the rear and side panels. Then I cut out the inner detail panel from the kit interior and substituted quilted upholstery made from Evergreen styrene tile patterned sheet cut at a 45-degree angle. A similar treatment was provided for the rear panel by making a surface piece glued to the sectioned kit rear panel which has a center panel cut out of it and filled with quilt-patterned styrene. Colors are Duplicolor Naples Gold over red oxide primer with Duplicolor Wimbledon White quilt panels and “carpeting”. I haven’t yet decided on steering wheel and dash panel details. The seats are from the Revell Stacey David Rat Roaster kit and will be finished with matching Wimbledon White quilted areas over Naples Gold . Still to do is the motor which I have already started. The basic engine is a Revell Parts Pack small-block Chevy with a six-pack of Stromberg 97’s. The engine block is finished in Wimbledon White to match the firewall and interior. There will be plenty of chrome to go with the show-car theme of this project. I have already chosen the wheels and tires but will save them for my next update. Thanx for lookin’, B. 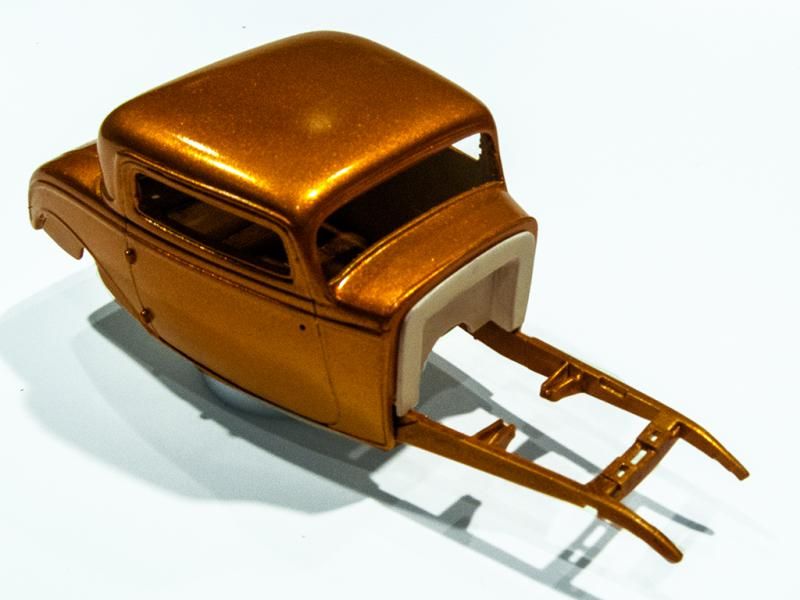 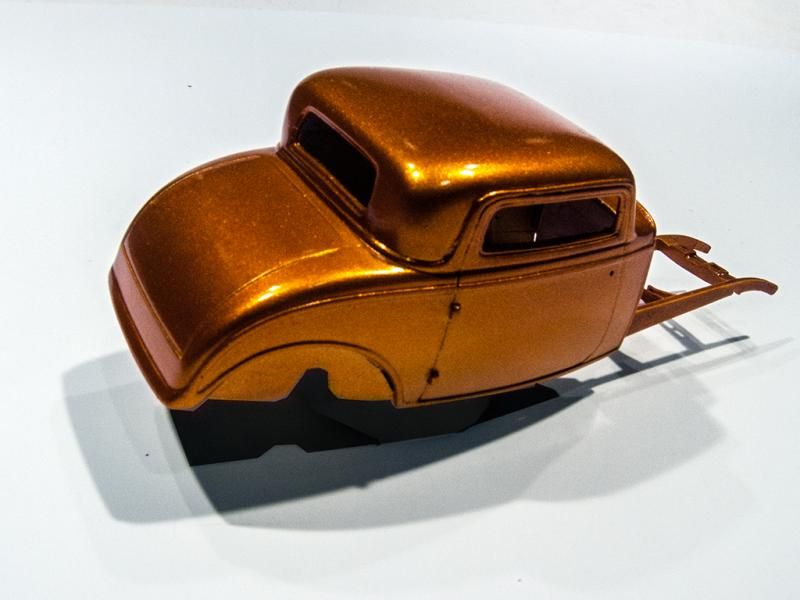 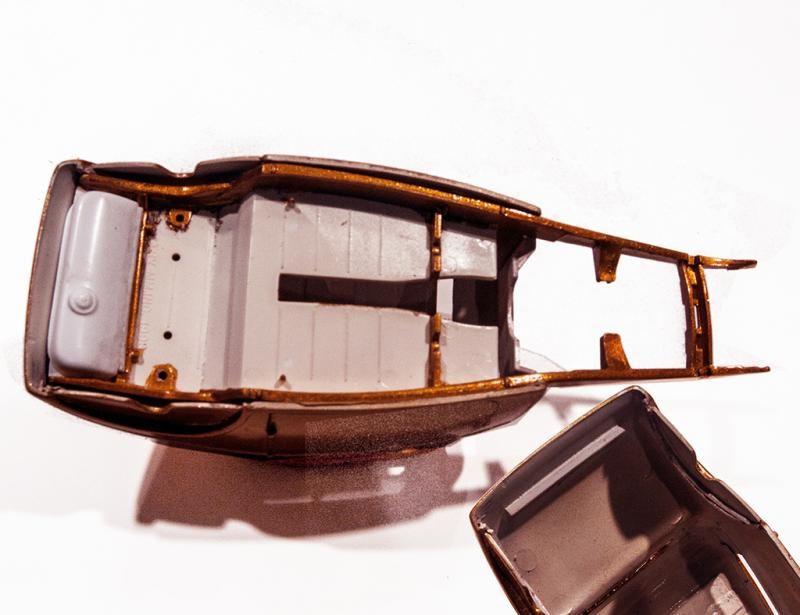 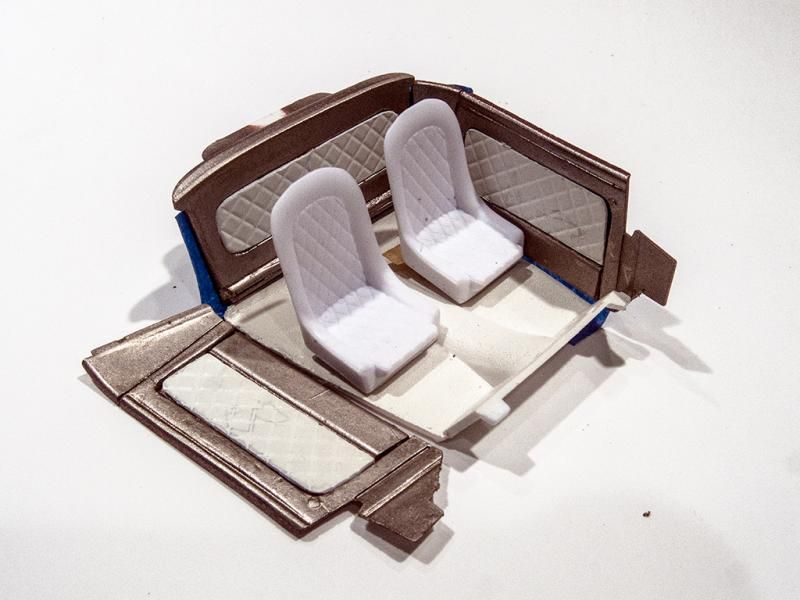 |
|
|
|
Post by JOE66 on Nov 24, 2014 15:53:48 GMT -4
Looking great, looking forward to seeing it done.
|
|
|
|
Post by KRAZY RICK on Nov 25, 2014 15:28:02 GMT -4
Major project !!
|
|
|
|
Post by 41CHEVY on Nov 26, 2014 12:19:54 GMT -4
Very nice work on the interior, I like the diamond pattern. Paul
|
|
|
|
Post by BERNARD "HOT ROD" KRON on Dec 12, 2014 20:28:50 GMT -4
Thanks guys! For some reason it feels like I’m moving through this project at a glacial pace. I just don’t have a lot to show for it when it comes to forum updates, even though I’m actually ready now for final assembly. The interior is finished and fitted to the body shell, ready to be glued into place. The dashboard is from the AMT Phantom Vickie kit. Window glass is cut, fitted and glued in place (but not terribly visible in photographs…). All the suspension bits are trimmed, fitted and ready to be glued into place. And finally, and at least something that hasn’t been shown before, the motor is done and already glued into the chassis. It’s a Revell Parts Pack small-block Chevy with 6 Revell Parts Pack Stromberg 97’s mounted to a manifold from a Revell ’57 Chevy Nomad kit. The exhausts are Revell Roth Tweedy Pie items, originally intended for my recently completed ‘27T Highboy (they wouldn’t clear the bodywork). Also in the “never shown before” category, the wheels and tires are done, including adapting them to the Revell suspension bits. The wheels are Modelhaus Radirs, zero offset at the front and standard offset at the rear. The tires are old-style Modelhaus with the Firestone branding on the sidewalls. Boy I sure miss them. I keep my eyes out for them on eBay and try to buy them when I can. The rears are slicks and the front T-110s, both with whitewalls. So, in point of fact all that’s left is to trim and fit the radiator, install the grill into the grill shell and do the final assembly. It shouldn’t be long now… Thanx for lookin’, B. 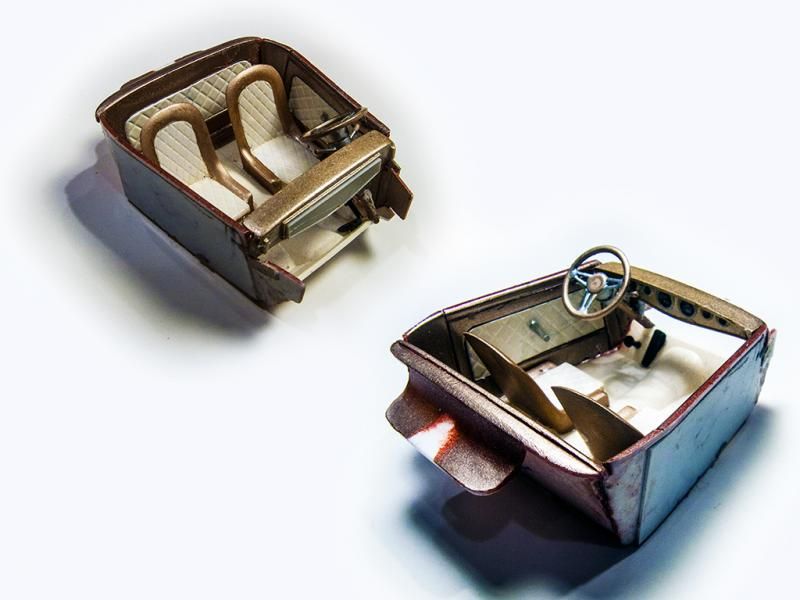 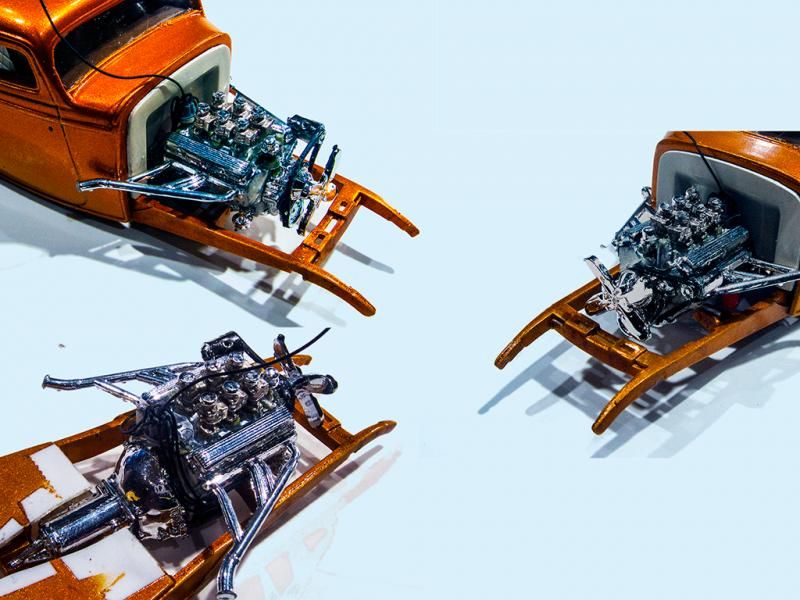 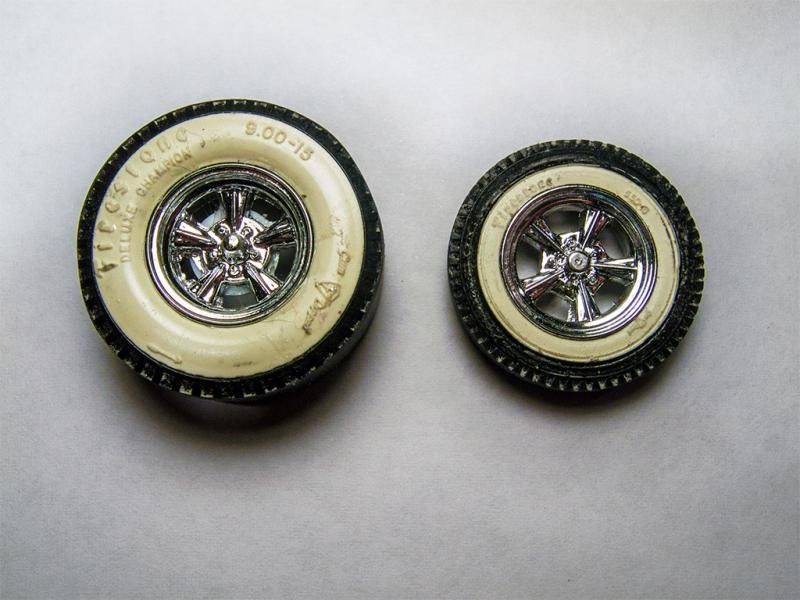 |
|
|
|
Post by 41CHEVY on Dec 12, 2014 20:42:40 GMT -4
Very, very nice. Paul
|
|
|
|
Post by KRAZY RICK on Dec 13, 2014 3:00:32 GMT -4
It's all coming together Bernard - that motor is a winner  |
|
|
|
Post by BERNARD "HOT ROD" KRON on Dec 20, 2014 21:50:20 GMT -4
Thanx guys! This will be the final update. I just have minor details like the radiator hoses, front crossbar, door handles and general cleanup to do and then I can take the final “beauty shots”. Lots of fabrication and fettling needed to be done, things like cutting a new drive shaft, modifying the kit exhaust system, notching the bottom of the grill shell to get the right height and spacing, etc. Looks like I’ll get it done in time for the December 31st deadline. The motor is completed. The Revell Parts Pack Stromberg 97s I used lack heft and height so I added a couple of chromed scoops which are actually the custom taillight bezels from the AMT ’53 Ford Pickup kit, with the front end opened up. The headers also have connecting pipes added to them to hook up to the kit mufflers installed in the undercarriage (I’ll include a chassis shot with the final presentation pictures). The grill is a Model Car Garage 4-inch chopped Deuce piece with the horizontal bars. The stock headlights were adapted from the Revell ’32 Ford 3-window kit to mount low on the shock mounts in keeping with overall stance of the car. At the rear the standard Revell Deuce kit ’48 Ford taillights have been thinned down so they don’t protrude so much. In addition I omitted the kit clear red lenses, instead painting the recessed surface with transparent red. The overall effect is finer and more realistically in scale to my eye. The license plate frame is from a Model Car Garage Revell Deuce 3-window p/e set. Thanx for lookin’ and following along, B. 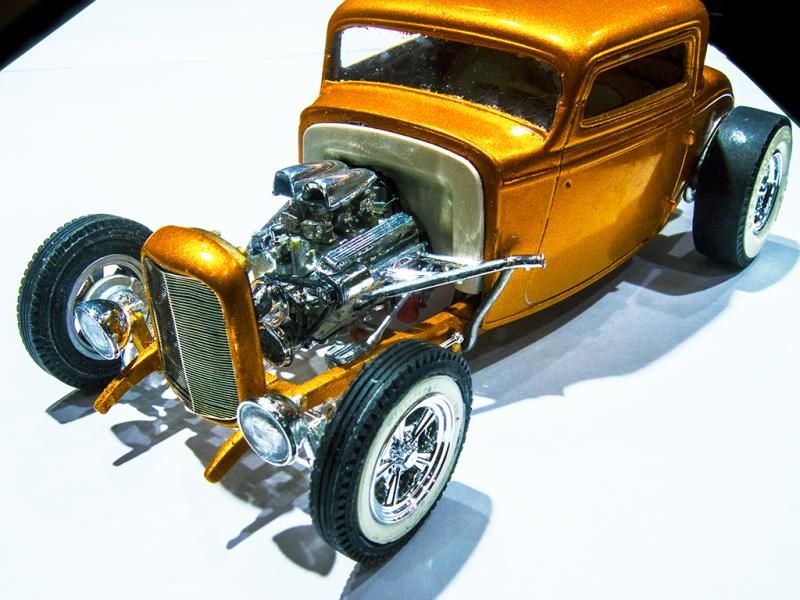 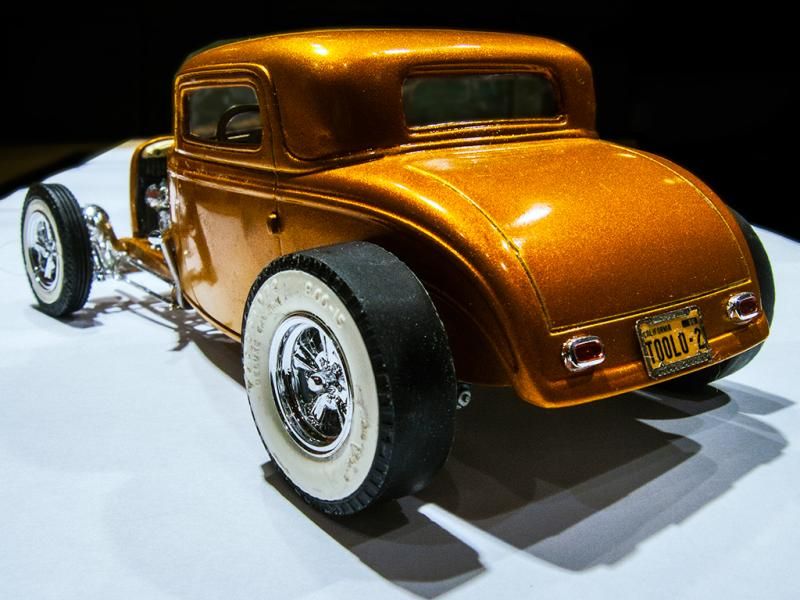 |
|
|
|
Post by JOE66 on Dec 21, 2014 19:49:36 GMT -4
That thing is tuff Bernard, the stance is dead-on !
|
|
|
|
Post by BERNARD "HOT ROD" KRON on Dec 28, 2014 12:32:41 GMT -4
Thanks Joe! This project is now done. The final beauty shots are under Completed Models.
|
|
|
|
Post by BERT "THE CRUSHER" on Dec 30, 2014 12:44:35 GMT -4
Bernard, you are a machine! Nice job!
|
|


